How To Apply Liquid Eyeliner: Your Guide To A Smooth Line
Learning how to apply liquid eyeliner can feel like a big challenge, especially when you are just starting out. Many people find it a bit tricky, and that is perfectly normal. You might feel like your hand shakes, or that getting a straight line is almost impossible. But honestly, with a few good tips and a little practice, anyone can get the hang of it. We are going to walk through it together, step by step, so you can feel more sure of yourself when you try it out.
For a lot of us, the idea of drawing a fine, even line right above our lashes seems like a skill only makeup artists possess. Yet, the truth is, it's really about understanding the tools and having a bit of patience with yourself. Think of it like learning to draw a picture; you start with simple shapes, and then you build on them. This guide aims to make that process clear, helping you avoid common frustrations and achieve the look you want, you know, with less fuss.
Liquid eyeliner can truly change your whole look, making your eyes seem brighter and more defined. It offers a crisp finish that pencils or gels sometimes just do not quite get. So, if you have been wanting to try it, or if you have tried before and felt a bit stuck, now is a good time to give it another go. We will cover everything from picking the right product to the actual putting on of the liner, giving you the confidence to create some really nice eye looks.
- Jameliz Benitez Smith Dana White
- Spin Doctors Net Worth
- Tony Hawk Spouse
- Hugh Jackman Haircut
- Tallest Katseye Member
Table of Contents
- Understanding Liquid Eyeliner
- Getting Ready for Application
- Step-by-Step Guide to Applying Liquid Eyeliner
- Common Challenges and Solutions
- Frequently Asked Questions
Understanding Liquid Eyeliner
Before you even pick up the eyeliner, it is helpful to know a little about what you are working with. Liquid eyeliner is, well, liquid makeup that you use to draw lines on your eyelids. As "My text" explains, to apply something means "to put on a surface, like to apply makeup to your face before work." So, you are putting this liquid on your skin, right above your lashes, to make your eyes stand out. Knowing this simple idea helps you think about how you will move the brush or pen.
Types of Liquid Eyeliner
There are, in fact, a few different kinds of liquid eyeliner you might find. Each one has its own feel and how it goes on. You have the pen-style liners, which look a lot like a felt-tip marker. These are often considered very good for people just starting out because they are easy to hold and give you a good amount of control. Then there are pot eyeliners, which come in a small jar with a separate brush. These can give a really intense color, but they might be a bit more challenging to use at first, you know, needing a steady hand.
Another type is the brush-tip liquid liner, which is like a pen but has a very fine brush instead of a felt tip. This kind can give you a super precise line, almost like a hair-thin one, but it does ask for a little more practice. Knowing these options, you can pick one that feels most comfortable for you to begin with. It is honestly about what you feel you can hold and move best.
- Madylin Sweeten
- Billie Eilish Dress To Impress Outfits
- Brigitte Macron Maiden Name
- John Stamos Spouse
- How Many Bee Gees Were There
Choosing Your Tool
When you are choosing your liquid eyeliner, think about what feels good in your hand. A pen-style liner, for instance, is often a good choice for beginners because it feels so familiar, like holding a regular pen. This can help you feel more stable as you draw your line. The tip matters too; some tips are very fine, while others are a bit thicker. A finer tip gives you more control for thin lines, but a slightly thicker one can be more forgiving if your hand is not perfectly steady, you know, allowing for a bit of wiggle room.
Color is also something to think about. Black is the most common and creates a bold look, but brown can be softer for everyday wear. There are also many other colors if you want to be more playful. Ultimately, the best tool for you is the one that makes you feel most confident and helps you achieve the look you are going for, so it's worth trying a few if you can, just to see what clicks.
Getting Ready for Application
Before you even bring the eyeliner near your eye, a little preparation can make a big difference. This step is often skipped, but it truly helps make the application smoother and the liner last longer. It is kind of like preparing a canvas before you paint; you want a good, clean surface to work on. This can really save you some frustration later on, you know, preventing smudges.
Prepping Your Lids
First things first, make sure your eyelids are clean and dry. Any oil or leftover makeup can make the liquid eyeliner not stick as well, or it might smudge easily. You can gently wash your face, or use a makeup remover on your eyelids, then pat them dry. After that, a very thin layer of eye primer can be a really good idea. Primer helps create a smooth surface for the eyeliner to glide over, and it also helps the liner stay put all day, or at least for many hours. It is honestly a small step that makes a big impact on how long your eyeliner looks good.
If you do not have eye primer, a little bit of face powder can also help absorb any extra oil and give the eyeliner something to grip onto. Just remember, you want a very light touch here; too much product can make the area look cakey. The goal is a clean, even base, which will make your eyeliner look its best, so take a moment for this part.
Finding Your Stance
This might sound a bit funny, but how you position yourself can really affect how steady your hand is. Try to sit or stand in front of a mirror where you have good light. You want to be comfortable. Many people find it helpful to rest their elbow on a table or counter. This gives your arm a stable base, which can reduce shaking. You can also rest the pinky finger of your applying hand gently on your cheek. This creates another point of contact, making your hand more steady, you know, like an anchor.
Some people find it easier to do one eye, then the other, while others prefer to do a little on each eye, going back and forth to ensure they match. Find what feels natural for you. It is about creating a situation where you feel calm and in control, which is pretty important for getting a good line. Just take a moment to get settled, and you will see it makes a difference.
Step-by-Step Guide to Applying Liquid Eyeliner
Now, let us get to the actual process of putting on the liquid eyeliner. This is where the practice comes in, but breaking it down into smaller parts makes it much easier to handle. Remember, it is okay if it is not perfect the first time, or even the tenth time. Everyone starts somewhere. The key is to be gentle with your eye area and to take your time, you know, not rush it.
The Dot or Dash Method
For beginners, drawing one long, continuous line can be very difficult. A simpler way is to use the "dot or dash" method. Start by placing small dots or very short dashes right along your upper lash line. You want these to be as close to your lashes as possible, almost in between them. Begin from the inner corner of your eye and work your way outwards. These dots or dashes will act as a guide for your full line, giving you a path to follow, so it is a really helpful trick.
Make sure these small marks are fairly close together. If they are too far apart, it will be harder to connect them smoothly. This method helps you build the line slowly, giving you more control over its shape and thickness. It is like connecting the dots in a picture; once you have your guide, filling it in becomes much simpler. This approach really takes some of the pressure off, you know, making it less intimidating.
Drawing the Line
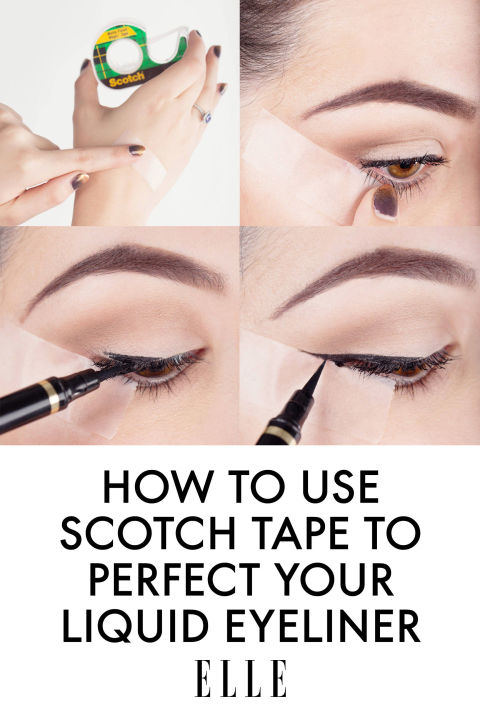
Once you have your guide dots or dashes, it is time to connect them. Gently, and with short, light strokes, draw a line to connect these marks. You want to keep the line as close to your lash roots as you can. It is often easier to do this by looking down into a mirror, with your chin slightly lifted. This position helps stretch the eyelid a bit, making the surface flatter for drawing.
You can go over the line a second time if you want it to be darker or a bit thicker. Just be sure to do it slowly and carefully. The idea is to build up the line rather than trying to get it perfect in one go. If you are aiming for a natural look, a very thin line is usually enough. For a more dramatic effect, you can make it a bit wider. Remember, to apply means to put on a surface, and you are just putting the color onto your eyelid, bit by bit, you know, like painting a fine detail.
The Winged Look
Creating a winged eyeliner look, sometimes called a cat eye, is a popular style that can really open up your eyes. It is basically an extension of your top eyeliner line that flicks upwards and outwards. To start, finish your regular top lash line. Then, imagine a line extending from your lower lash line upwards towards the tail of your eyebrow. This helps you figure out the angle for your wing, so it looks good with your eye shape.
Draw a small, thin line from the outer corner of your eye following that imagined angle. This is the bottom edge of your wing. Next, draw another small line from the tip of that first line back towards the middle of your upper lash line, creating a triangle shape. Then, simply fill in that triangle. You can make the wing longer or shorter, thicker or thinner, depending on the look you want. It takes some practice to get both wings to match, but honestly, even experienced people find that a bit of a challenge sometimes, you know, it is not always perfect.
Cleaning Up Mistakes
It is almost guaranteed that you will make a small mistake or two, especially when you are learning. Do not worry about it at all. That is totally normal. The key is to have a plan for fixing it. A cotton swab, also known as a Q-tip, dipped in a little bit of makeup remover or micellar water, is your best friend here. You can use the tip of the swab to gently clean up any smudges or uneven lines. Just be very gentle around your eye area.
For very small corrections, a clean, dry cotton swab can sometimes do the trick if the liner is still wet. If you have made a bigger mistake, it is okay to just wipe it off and start that eye again. It is better to take a moment to fix it than to walk around with something that makes you feel less confident. Remember, practice makes things better, and cleaning up is part of the practice, you know, it is all part of the process.
Common Challenges and Solutions
Applying liquid eyeliner can bring up a few common issues, but there are ways to work around them. Knowing these little tricks can save you a lot of frustration and help you get a smoother, more polished look. It is about understanding what might go wrong and having a simple fix ready, you know, like having a backup plan.
Shaky Hands
Many people deal with shaky hands when trying to draw a precise line. This is a very common concern. To help with this, try to brace your hand. As mentioned earlier, resting your elbow on a table or counter can provide a lot of stability. You can also try resting your pinky finger on your cheek or forehead. This creates a solid anchor point for your hand, which can greatly reduce movement. Some people even find it helpful to hold their breath for a few seconds while drawing the line, but do not hold it for too long, of course.
Another tip for shaky hands is to use the dot or dash method, as we talked about. Drawing short, controlled segments is much easier than trying to draw one long, continuous line. You can also try using a liquid eyeliner pen that has a slightly thicker barrel, as this can be easier to grip and control. It is really about finding what gives you the most stability, so experiment a bit.
Uneven Lines
Getting both eyes to look exactly the same can be a real challenge, even for people who have been doing this for a long time. It is perfectly normal if your lines are not identical. One way to tackle unevenness is to work on both eyes little by little, rather than finishing one eye completely before starting the other. Do a small segment on one eye, then do a similar segment on the other. This helps you compare as you go along.
If one line is thicker than the other, you can carefully add a tiny bit more to the thinner line to match. Remember, it is easier to add more than to take away. Using a magnifying mirror can also help you see details more clearly, making it easier to spot and correct unevenness. Honestly, a slight difference is usually not noticeable to anyone else, so do not stress too much about absolute perfection, you know, it is about getting it close.
Smudging and Transfer
Liquid eyeliner can sometimes smudge or transfer onto your upper eyelid, especially if you have oily lids or hooded eyes. This can be quite annoying. To help prevent this, make sure your eyelids are properly prepped with a primer or a light dusting of powder before you apply the liner. This creates a drier surface that the eyeliner can stick to better.
Also, give your liquid eyeliner enough time to dry completely before you open your eyes wide or blink too much. Some formulas dry faster than others, so it is good to know your product. If you are still having trouble, you might try a waterproof or long-wearing formula. These are made to stay put better through the day. Setting your eyeliner with a tiny bit of black or brown eyeshadow patted on top can also help seal it in, you know, making it last longer.
Frequently Asked Questions
What is the easiest way to apply liquid eyeliner?
The easiest way for many people, especially when starting out, is to use a pen-style liquid eyeliner. This type feels like a marker, making it simple to hold and control. Instead of drawing one long line, try using the "dot or dash" method. You put small dots or very short lines right along your lash line, then gently connect them. This helps you build the line slowly and precisely, which is honestly a great way to begin, you know, to get comfortable.
Should I apply liquid eyeliner before or after eyeshadow?
Most people apply liquid eyeliner after eyeshadow. Applying eyeshadow first gives you a clean base and allows you to shape your eye look before adding the sharp line of the eyeliner. If you put eyeliner on first, the eyeshadow might cover it up or make it look less crisp. However, if you are just wearing eyeliner without eyeshadow, you would, of course, apply it directly to your prepped lid. It is generally about building up your eye makeup in layers, so eyeliner is usually one of the last steps.
How do you apply liquid eyeliner without it looking thick?
To keep your liquid eyeliner from looking too thick, focus on drawing a very thin line right at the base of your lashes. Start with the lightest pressure possible. If you are using a pen or brush, hold it almost flat against your lash line instead of pointing it straight down. You can always add a second, very thin layer if you want more intensity, but it is much harder to make a thick line thinner. Remember to take small, controlled strokes, and do not try to get the whole line done in one go. It is really about building it up slowly, you know, with a light touch.
For more beauty tips, you can visit a popular beauty blog to see what is new. Learn more about eyeliner techniques on our site, and for more detailed instructions, you can also link to this page our step-by-step guide.
- Reepot Laser Los Angeles
- Carter Cooper
- Jcpenney East Brunswick Hours
- Maplestar Highschool Dxd Full Video
- Toby Keith Wife

Decorate You: 2 Ingredient DIY Long Lasting Liquid Eyeliner | Liquid
Liquid Eyeliner Tips - Scotch Tape Tips to Perfect Your Liquid Eyeliner

How to Apply Mascara - Mascara Tips and Tricks! | Mascara tips, How to
