How To Tie A Bandana On Your Head: Easy Styles For A Fresh Look Today
Putting a new spin on your everyday look can feel wonderful, can't it? Perhaps you're looking for a quick way to manage your hair, or maybe you just want to add a splash of color to your outfit. Learning how to tie a bandana on your head offers just that kind of simple, yet impactful, change. It's a classic accessory that brings a touch of effortless cool to any ensemble, and it's something anyone can master with a little practice.
For many, a bandana is more than just a piece of fabric; it's a statement. It's a way to show off a bit of personality, perhaps with a bold pattern or a favorite color. Think about it: just like a well-chosen tie can complete a formal outfit, a bandana can really pull together a casual, fun vibe. It’s an accessory that lets you play with design and express your personal style, so it's almost like another way to show who you are.
This simple square of cloth, really, holds so much potential. Whether you're aiming for a retro feel, a practical hair solution, or just a bit of flair for a sunny day, knowing how to tie a bandana on your head is a useful skill. We're going to go through some popular ways to wear one, step by step, making it easy for you to try out these looks yourself, perhaps even today.
- When Did Charles And Camilla Marry
- Dot Marie Jones
- Why Is Anderson Cooper Leaving Cnn
- Does Hair Oil Work As Heat Protectant
- Shampoo For Wavy Hair
Table of Contents
- Getting Your Bandana Ready: The Basic Fold
- The Classic Headband Style
- The Full Head Wrap for Maximum Coverage
- The Iconic Rosie the Riveter Look
- The Under-Hair Bandana Style
- Weaving a Bandana into Your Braid
- General Tips for Keeping Your Bandana in Place
- Bandanas for Different Hair Types and Lengths
- More Ideas for Styling Your Bandana
- Frequently Asked Questions About Bandanas
Getting Your Bandana Ready: The Basic Fold
Before you even think about putting that fabric on your head, you need to prepare it. This first step is pretty important for nearly every bandana style you might try. It's all about getting that neat, even strip of fabric.
Start by laying your bandana out flat. Make sure it's smoothed out, no wrinkles or creases that will mess up your final look. A fresh, clean bandana, you know, just works better.
Take one corner of the square and fold it over to meet the opposite corner. This will make a triangle shape. You'll see the two points line up, more or less, and the long edge will be at the bottom.
Now, take the pointed tip of that triangle and fold it down towards the long edge. You're creating a little strip here. This is, like, the start of getting it into a band shape.
Keep folding the bandana in on itself, from the folded edge up towards the long edge. Each fold should be about an inch or two wide, depending on how wide you want the final band to be. This is a bit like folding a ribbon, you know, for a present.
Continue folding until you have a long, neat strip of fabric. This strip is what you'll use for most head-tying methods. It's really the foundation for almost any way you choose to wear it.
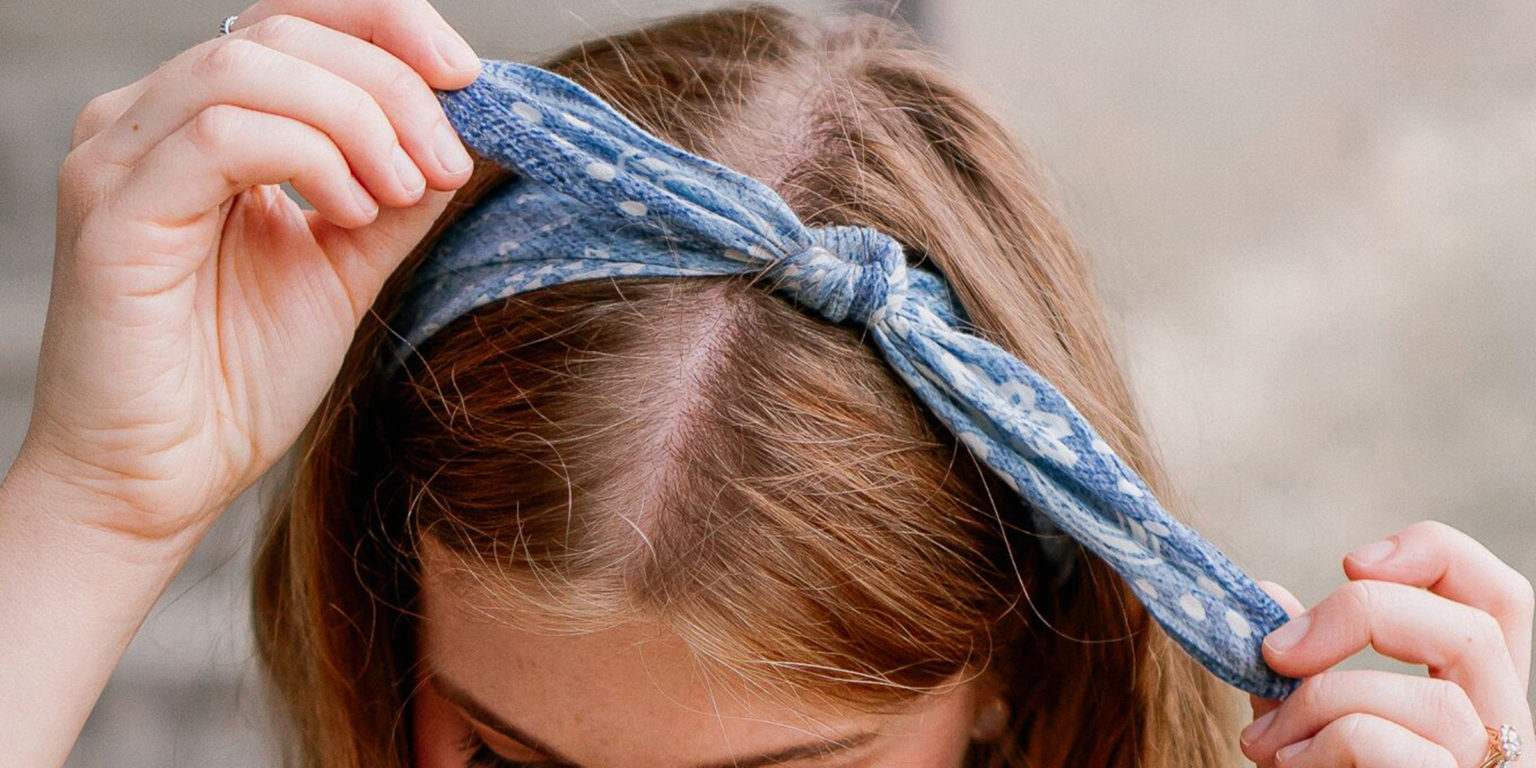
The Classic Headband Style
This is probably the most common and easiest way to wear a bandana on your head. It works for almost any hair length and gives off a very relaxed, yet put-together, feeling. It’s a very versatile look, actually.
Steps for the Headband Look
First, get your bandana folded into that long strip we just talked about. Make sure it's smooth and even. You want it to look quite tidy, you know, when it's on your head.
Hold the strip with both hands, one hand on each end. Place the middle of the strip against your forehead, right at your hairline. Some people like it a little further back, so it's really up to you.
Bring the two ends of the bandana around to the back of your head. They should meet just under your hair, near the nape of your neck. Try to keep the bandana flat against your head as you bring the ends around.
Tie the ends together in a simple knot. A double knot is usually better for security, as it helps keep the bandana from slipping off. You want it to feel snug, but not too tight, obviously.
Adjust the bandana as needed. You can slide it forward or back a little to get the perfect position. You might want to pull a few strands of hair out around your face for a softer look, too it's almost a little bit messy, but in a good way.
Tips for Keeping Your Headband Secure
For extra grip, especially if you have very smooth or fine hair, you can try using a few bobby pins. Just slide them in under the bandana, near the knot or along the sides, to hold it in place. This really helps, you know, to prevent it from moving.
Texturizing spray or dry shampoo can also give your hair a little more grip, making it harder for the bandana to slide. A little bit of product, that is, can go a long way.
Make sure the knot is tight enough. A loose knot is more likely to come undone or allow the bandana to shift around. You don't want it, like, falling off in the middle of the day.
The Full Head Wrap for Maximum Coverage
This style is great for bad hair days, protecting your hair from the sun, or just making a bold fashion statement. It covers most of your head, giving a very chic, somewhat retro, look. It's a bit more involved, but still quite easy.
How to Create a Full Head Wrap
Start with your bandana unfolded, a full square. Lay it out flat. This is, you know, the biggest difference from the headband.
Fold the bandana in half diagonally to form a large triangle. The long edge of the triangle will be the base. You want this fold to be pretty precise, actually.
Place the middle of the long, folded edge against your forehead, right at your hairline. The point of the triangle should be hanging down your back. This is the starting point, basically.
Bring the two side points of the triangle around your head, over your ears, and towards the back. They should meet at the nape of your neck, covering your hair. You're trying to gather all your hair under it, more or less.
Take the two side points and tie them together in a knot over the dangling point of the triangle. You can do a single knot first, then a double knot for security. Make sure it feels secure, that is, against your head.
Now, take the remaining point of the triangle that was hanging down your back. Tuck it up and under the knot you just made. You want to hide that loose bit of fabric, really.
Adjust the bandana so it feels comfortable and looks neat. You can pull it forward or back slightly to cover more or less of your forehead. It should feel pretty snug, you know, all around.
Variations for the Full Head Wrap
For a different look, you can tie the knot at the top of your head instead of the back. Just bring the two side points up over your head and tie them there. This gives a very different, almost turban-like, appearance.
You can also twist the two side points before tying them, creating a more textured knot. This adds a bit of visual interest, in a way, to the top of your head.
Some people like to leave a bit of hair out around the face, even with a full wrap. This can soften the look and make it feel a bit more relaxed. It's really about personal preference, you know.
The Iconic Rosie the Riveter Look
This style is all about vintage charm and empowerment. It's instantly recognizable and adds a playful, yet strong, element to your outfit. It's very popular, especially for themed events or just a fun day out.
Achieving the Rosie Style
Start with your bandana folded into that long strip, just like for the headband. Make sure it's a good width for your head, not too thin. This is, like, pretty important for the overall shape.
Gather your hair into a high ponytail or bun at the crown of your head. This is where the bandana will sit, so make sure it's pretty neat. You want to have a good base for it, you know.
Place the middle of the folded bandana strip at the nape of your neck, under your hair. Bring the two ends up over your head, towards your forehead. You're going from back to front, basically.
Tie the two ends together in a knot right at the top of your head, just above your forehead. You can make a single knot first, then a double knot to keep it secure. You want it to be pretty firm, actually.
Now, create a bow with the two loose ends of the bandana. Or, if you prefer, you can just tuck the ends under the knot for a simpler look. The bow is, you know, what really makes it the "Rosie" style.
Adjust the bandana so that it sits nicely around your hairline and frames your face. You might want to pull a few small pieces of hair out around your temples for a softer, more natural look. It's really about getting it just right, you know, for your face.
Hair Considerations for the Rosie Look
This style works best with hair that can be pulled up into a bun or ponytail. Longer hair is typically easier, but medium-length hair can work too with enough pins. You need something to anchor it to, you know.
If your hair is shorter, you can still achieve a similar effect by using more bobby pins to secure the bandana. You might just need to adjust how much hair you try to gather. It's a bit of a challenge, perhaps, but still possible.
A little hairspray can help keep stray hairs in place, especially around the bun or ponytail. You want the overall look to be pretty neat and tidy, actually, for this style.
The Under-Hair Bandana Style
This is a more subtle way to wear a bandana, where it peeks out from underneath your hair, giving just a hint of color or pattern. It's great for adding a little something extra without making the bandana the main focus. It's a very understated look, you know.
Steps for a Subtle Bandana
Fold your bandana into a thin strip, perhaps even thinner than for the classic headband. You want it to be quite narrow, actually, for this particular style.
Place the middle of the strip at the back of your head, underneath your hair, near the nape of your neck. Let the ends hang forward over your shoulders. This is, like, the opposite of the headband placement.
Bring the two ends up and tie them in a knot at the top of your head, or slightly off to the side, underneath your hair. You want the knot to be hidden by your hair. This is the key, you know, to making it subtle.
Let your hair fall naturally over the bandana, so only a small part of it shows. You might need to adjust your hair to cover the knot completely. It's a bit like a secret accessory, in a way.
This style works particularly well with longer hair, as it provides more coverage for the bandana. It's a very simple addition, you know, that can make a big difference.
Weaving a Bandana into Your Braid
This is a super fun and creative way to incorporate a bandana into your hairstyle. It adds color, texture, and a unique touch to a simple braid. It's a bit more advanced, perhaps, but still quite doable.
How to Braid with a Bandana
Fold your bandana into a long, thin strip. The thinner the strip, the more subtle the bandana will be in your braid. You want it to be pretty even, actually.
Gather your hair into a ponytail where you want your braid to start. This could be a low ponytail, a side ponytail, or even a high one. It depends on where you want the braid, you know.
Take the folded bandana strip and tie it around the base of your ponytail, making a secure knot. Make sure it's tight enough so it won't slip out while you're braiding. You don't want it, like, coming undone.
Divide your ponytail into two sections of hair. The two ends of the bandana will act as your third strand for the braid. So, you'll have two hair sections and one bandana section, basically.
Begin braiding your hair as you normally would, using the bandana as one of the three strands. Make sure to keep the bandana flat as you braid to avoid it twisting. It's a bit like braiding with a piece of ribbon, you know.
Continue braiding down to the end of your hair. Secure the end of the braid with a hair tie. You can then tie the remaining bandana ends into a small bow or knot around the hair tie, or just let them hang. It's a very pretty look, you know, when it's done.
General Tips for Keeping Your Bandana in Place
No one wants their bandana to slip off, right? Here are some general tips to make sure your headwear stays put all day long. These are pretty useful, actually, no matter which style you choose.
Always start with a clean, well-folded bandana. A messy fold can lead to a messy, insecure tie. A neat start, that is, makes for a neat finish.
Consider the fabric. Cotton bandanas tend to have more grip than silkier ones. If you have a very smooth bandana, you might need extra pins. It's a bit like how different fabrics behave in ties; some are more slippery, you know.
Don't be afraid of bobby pins. They are your best friend for securing any head wrap. Place them strategically under the bandana, especially at the sides and near the knot. They are very helpful, really.
A little backcombing or texturizing spray at the roots where the bandana sits can provide a better surface for it to grip. This adds a bit of friction, in a way, that helps it stay put.
Practice makes perfect. The more you tie your bandana, the better you'll get at making it secure and comfortable. It's like learning any new skill, you know, it takes a bit of time.
Bandanas for Different Hair Types and Lengths
Bandanas are pretty versatile, but some styles work better with certain hair types. Here’s a quick look at how to make them work for you. It's really about adapting, you know.
For short hair, the classic headband style or the Rosie the Riveter look are great choices. They add a lot of style without needing much hair to hold them. You might need more bobby pins, though, to keep them from slipping. It's a bit of a challenge, perhaps, but still very stylish.
Medium-length hair can pull off almost any bandana style. You have enough hair to create buns or ponytails for the full wrap or Rosie look, but it's also short enough for easy headbands. It's, like, a pretty good length for bandanas.
Long hair is fantastic for bandanas. You can do full head wraps, weave them into braids, or create voluminous Rosie styles. The length provides a lot of grip and many options. You have, you know, a lot of room to play.
For fine or slippery hair, always use bobby pins and consider a texturizing product. Tying the bandana a little tighter can also help. It's about finding what works best for your hair, really.
Thick or curly hair often provides natural grip for bandanas. Full head wraps can be great for managing volume, and headbands stay put very well. You might just need a slightly larger bandana, you know, to get full coverage.
More Ideas for Styling Your Bandana
Beyond just tying it on your head, a bandana can be a really fun accessory. It's a bit like how different patterns of ties can change a whole outfit; bandanas do that for a casual look. They come in so many designs, from classic solids to bold patterns, allowing you to find the perfect accent for any outfit, just like you would with a menswear accessory. You can explore different colors and prints, perhaps even a floral coral pink or a floral rust blooms design, just like some popular ties.
Try matching your bandana to an accent color in your outfit. If you have a blue shirt with a small red detail, a red bandana can really tie the whole look together. It's a very simple way, you know, to make things cohesive.
Wear a bandana with sunglasses for an instant cool factor. This look is very popular, especially in warmer weather. It gives a very effortless vibe, actually.
Experiment with different knot placements. Instead of tying it at the back, try tying it on the side for an asymmetrical look. Or, you know, make a little bow on top.
Consider the occasion. A simple headband is great for everyday wear, while a full head wrap might be perfect for a beach day or a festival. It's about picking the right style, you know, for the moment.
You can even use a bandana as a pop of color for your ponytail. Just tie it around the base of your ponytail or bun. It's a very quick way, really, to add some flair.
Think about the overall vibe you want. A plain black bandana can be edgy, while a pastel floral one feels sweet. The pattern, you know, makes a big difference.
Frequently Asked Questions About Bandanas
Here are some common questions people ask about tying bandanas on their heads. These are, like, pretty typical things people wonder about.
How do you tie a bandana on your head so it stays?
To make sure your bandana stays put, start with a good, tight fold into a strip. When you tie the knot, make it a double knot. You want it to feel snug, but not uncomfortable. Using bobby pins, especially at the sides and near the knot, is a very good idea for extra security. Also, if your hair is very smooth, a little texturizing spray can give it some grip, that is, which helps a lot.
What is the best way to fold a bandana for your head?
The best way to fold a bandana for your head usually starts by laying it flat and folding it diagonally to create a triangle. Then, you take the pointed tip of the triangle and fold it down towards the long edge. Continue folding the bandana in on itself, in even strips, until you have a long, neat band. This method, you know, creates a clean base for almost any head-tying style you might try.
Can you wear a bandana with short hair?
Absolutely, you can wear a bandana with short hair! The classic headband style works very well, and the iconic Rosie the Riveter look is also quite popular for shorter cuts. You might find that you need to use more bobby pins to keep the bandana from slipping, as there's less hair for it to grip onto. But, you know, it's a great way to add style and color to short hair, really.
Learn more about bandana styles on our site, and link to this page for more accessory ideas.
- Tom Hiddleson
- Raven Teen Titans Real Name
- How Much Is Tiger Woods Worth
- Tlc Channel What Does It Stand For
- My Vanilla Check Balance
How to Tie Bandana on Head - A Few Tips - Your Fashion Guru

4 Ways to Tie a Bandana - wikiHow

the Easiest Way to Tie a Bandana Around Your Neck - Paisley + Sparrow
