How To Draw Fire: A Simple Guide For Everyone
Learning to draw a fire can bring a real sense of warmth and coziness to your artwork, you know? It's that symbol of home and comfort, and getting it right on paper or screen feels quite good. For kids and beginners alike, drawing a great looking fire is now something you can absolutely do, so don't feel like it's out of reach. We have worked on a drawing video and this guide, featuring our method for drawing fire, and we truly hope this tutorial is useful for you.
Fires and their flames are dynamic, which can make drawing fire tricky, that is true. They don't have one solid form or color, and that can seem a bit challenging at first glance. However, there are some simple tricks you can use to make it much easier, and we will help simplify exactly how to draw flames in this fantastic tutorial. We will walk you through each stage, from basic shapes to adding those vibrant colors.
Drawing fire can be both fun and a bit of a challenge, as it involves capturing the moving shapes and bright colors of flames. In this tutorial, we will show you how to draw a candle flame, a campfire, and even a thrown flame, using just a few simple tools. Beginners and younger kids alike can easily follow along and have a great time, so let's get started, shall we?
- Who Is Oprahs Current Partner
- Are Sara Driver And Adam Driver Related
- When Was Drakes First Song Released
- Ari Fletcher Baby Daddy
- George George Bush
Table of Contents
- Getting Started with Fire Drawing
- Drawing a Single Flickering Flame
- Drawing a Candle Flame
- Drawing a Campfire
- Drawing a Thrown Flame
- Tips for Making Your Fire Look Real
- Frequently Asked Questions About Drawing Fire
Getting Started with Fire Drawing
Why Drawing Fire Can Be a Treat
Drawing fire is a chance to play with shapes and colors that are always moving, you know? It's not like drawing a still object, which can be a bit more straightforward. Flames have this wonderful, shifting quality, and capturing that motion can feel really rewarding. It lets you express warmth and energy in your art, which is something many people enjoy.
For many, fire represents coziness and home, so being able to put that feeling into a drawing is quite special. It's a skill that adds a lot to your artistic toolkit, letting you create scenes that feel alive and inviting. You might find it surprisingly relaxing to work on these flowing shapes, actually.
Tools You Might Use
You do not need many fancy tools to begin drawing fire, that is true. A simple pencil and paper are always a good start, of course. For adding color, you might use colored pencils, crayons, or even paint. What matters most is getting a feel for the shapes and how light works with them.
- Sara Jay Feet Pics
- Who Is Bryan Cranstons Father
- Andrew Garfield Young
- John Wall Net Worth
- Dermabrasion Tattoo Removal
If you prefer digital art, there is a free online drawing application for all ages that you might find very useful. It lets you create digital artwork to share online and export to popular image formats like JPEG, PNG, SVG, and PDF. We just updated sketchpad to version 4.1 and we think you will love it, by the way. This tool can make drawing fire even more fun, especially with its features for blending colors.
This application, Sketchpad, lets you easily draw, edit photos, or design your next business card, so it is quite versatile. You can craft images for social media posts, digital ads, paper, or even apparel. You can make a quick photo edit with the drag and drop feature, or you can draw on a blank canvas. It is a really handy tool for trying out fire drawing digitally, and it is free, which is great.
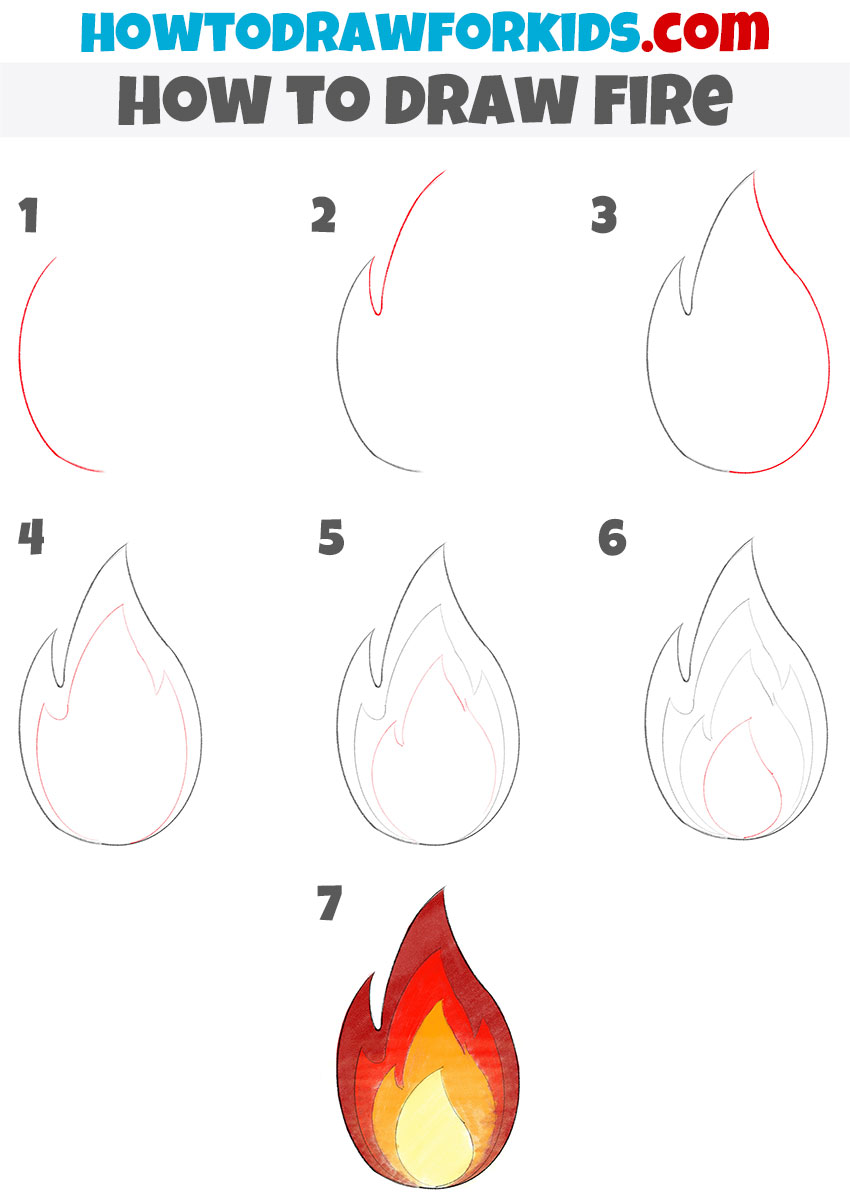
Drawing a Single Flickering Flame
To start learning how to draw fire, try drawing a single flickering flame first, so you can get the hang of it. This helps you understand the basic movements and forms before you tackle a whole campfire. It is like practicing one small dance step before doing the whole routine, you know?
Step 1: The Initial Curve
To begin, sketch a smooth, curved line on the left side of your drawing area. This line will form the outer contour of your flame, more or less. The curve can be slightly irregular, which is good because real flames are not perfectly smooth, you see. Think of it as the start of a gentle, waving shape.
Make this line light at first, as you might need to adjust it later. It is just a guide, after all. This initial curve helps set the height and general direction of your flame. You want it to feel like it is moving upwards, you know, sort of reaching for the sky.
Step 2: Building the Flame Body
From the top of that first curve, draw another smooth, curved line that comes down to meet the first one, forming a sort of teardrop or wavy shape. This creates the main body of your flame. Remember, flames are not pointy like a perfect triangle; they are more rounded and soft at the top, typically.
You can make the bottom of this shape a bit wider, and then it narrows as it goes up, sort of like a stretched-out water drop. This gives your flame a good base to build upon. It is about getting that overall flow, you know, that natural upward movement.
Step 3: Adding Inner Shapes
Inside your main flame shape, draw one or two smaller, similar shapes. These inner shapes should follow the same general curve as the outer one, but they will be smaller and sit within the larger form. These represent the hotter, brighter parts of the flame, usually.
Think of them as layers within the flame. The innermost shape might be the smallest and brightest. These shapes give your flame depth and make it feel more real, as a matter of fact. They help show that fire is not just one flat color, but many layers of light.
Step 4: Layering Colors
Now comes the color, which is where the fire truly comes to life. Start with the brightest color, perhaps a light yellow or even white, in the very center, on that smallest inner shape. This is the hottest part of the flame, so it is the brightest, you see.
Around that, use orange, then a deeper orange, and finally, reds on the outer parts of the flame. You want to blend these colors smoothly, so they transition from one to the next without harsh lines. This layering creates that glowing effect, more or less.
You can even add a touch of dark red or brown at the very base of the flame, where it connects to its source, like a wick. This helps ground the flame and adds to its realism. The idea is to show the heat fading outwards, you know?
Step 5: Giving It a Glow
To make your flame really pop, add a soft glow around the outside of the main flame shape. Use a very light wash of yellow or orange, extending just beyond the red outline. This shows the light the flame is giving off, which is a very important part of drawing fire.
This glow makes the flame feel like it is truly illuminating its surroundings. It is a subtle touch, but it makes a big difference in how real your fire looks, honestly. You can even add a bit of a darker background if you want the glow to stand out even more, like for a candle flame, apparently.
Drawing a Candle Flame
A candle flame is a classic, and it is a great way to practice drawing fire in a focused way. It is a bit different from a campfire because it is smaller and often seen against a darker setting. This guide will help you draw a candle flame on a dark background, so you can really see its light, you know?
Understanding Candle Flames
A candle flame has a distinct shape, usually a tall, narrow teardrop. It is quite steady, flickering just a little, unlike a wild campfire. The light it gives off is concentrated, and it illuminates the wax and the area right around it. It is a very contained sort of fire, in a way.
Focusing on understanding fire’s shape, transparency, and interaction with light is really key here. A candle flame is a perfect subject for this, as it is relatively simple yet shows these qualities very clearly. It is a good next step after drawing a single flickering flame, you know?
Step 1: The Wick and Base
Start by drawing the candle itself, or at least the top part of it. Then, draw a small, thin line for the wick sticking up from the center of the candle. This wick is where the flame will begin, obviously. It should be dark, perhaps black or a very dark gray.
Just above the wick, draw a tiny, very dark spot. This is the very base of the flame, where the fuel is burning most intensely. It is a small detail, but it makes a difference, really. This spot helps anchor the flame to the wick, which is important for realism.
Step 2: The Tear-Drop Shape
Now, draw the main flame shape, rising from that dark spot above the wick. It should be a tall, slender teardrop, slightly wider at the bottom and tapering to a soft point at the top. Remember, it is not a sharp point, but a gentle curve, usually.
Inside this main shape, draw a smaller, similar teardrop, and inside that, an even smaller one. These layers will be where you put your brightest colors. This layering technique is quite important for showing the different heat zones within the flame, as a matter of fact.
Step 3: Color and Light Play
Begin coloring the innermost, smallest teardrop with a bright, almost white yellow. This is the hottest part. Around that, use a vibrant orange, then a deeper orange, and finally, a rich red for the outer layer of the flame. Blend these colors smoothly, so they flow into each other, you know?
Since you are drawing this on a dark background, the light from the flame will be very noticeable. Add a soft, warm glow around the entire flame, extending outwards. This glow should be a light yellow or orange, fading into the dark background. It makes the flame look like it is truly shining, honestly.
You might also add a subtle highlight on the top edge of the candle wax, where the flame's light would hit it. This helps connect the flame to its surroundings and makes the whole drawing feel more cohesive. It is all about showing how the light interacts with things, after all.
Drawing a Campfire
A campfire is a symbol of warmth and gathering, and drawing one is a bit different from a single flame. It involves many flames, smoke, and the glow on the surrounding logs. This guide will help you draw a campfire on a light background, so you can see how the flames stand out, you know?
Campfire Basics
A campfire is a collection of individual flames rising from burning wood. It is often smoky, and the light it casts is much wider and more intense than a candle flame. You will want to think about the logs that are burning and how the flames twist and turn around them, actually.
The key here is to capture the chaotic yet beautiful nature of a larger fire. It is not just one flame, but many, all dancing together. This can be a bit more involved, but it is definitely doable, and the result is quite impressive, in a way.
Step 1: The Log Foundation
Start by sketching the logs or branches that are fueling your campfire. These can be simple cylinder shapes, overlapping each other. Make sure to leave gaps between them where the flames will rise. The logs give your fire something to burn, obviously.
You can add some texture to the logs to make them look like wood. These details will help ground your fire in the scene. It is important to remember that the logs are part of the fire, too, even if they are not actively flaming, you know?
Step 2: Multiple Flames
Now, from the gaps between your logs, draw several individual flame shapes. These should vary in size and height, just like a real campfire. Some can be tall and slender, others shorter and wider. Overlap them a little to create a sense of depth, typically.
Each flame can have those inner layers of color, just like the single flame you practiced. Use bright yellows in the center, oranges around that, and reds on the outer edges. The more variety in your flame shapes, the more natural your campfire will look, as a matter of fact.
You can even have some smaller, flickering flames just starting to appear from parts of the logs. This adds to the sense of movement and life in your drawing. It is about creating a dynamic scene, you know?
Step 3: Smoke and Embers
Above the flames, add some wisps of smoke. Smoke usually rises and spreads out, becoming less dense as it goes higher. Use light gray or even a very light blue for the smoke, making it translucent so you can still see through it a bit, apparently.
For embers, draw tiny, glowing dots of orange and red around the base of the flames and on the burning parts of the logs. These small details add a lot to the realism of your campfire. They show the heat and the burning process, you see.
Step 4: The Background Glow
Since this is on a light background, the glow will be more subtle, but still important. Add a warm, soft wash of light orange or yellow around the entire campfire, extending slightly outwards onto the ground or surrounding area. This shows the light the fire is casting, you know?
You might also add some shadows on the parts of the logs that are not directly lit by the flames. This contrast helps make the glowing parts stand out even more. It is about creating that sense of light and shadow that real fires produce, honestly.
Drawing a Thrown Flame
Drawing a thrown flame is a bit more advanced, as it involves showing motion and a more intense burst of fire. This is a dynamic flame, not sitting still like a candle or campfire. It is about capturing energy and movement, you know?
What Makes a Thrown Flame Different
A thrown flame is often less organized than a stationary one. It might have streaks, trails, and a more irregular shape due to air resistance and the force of being thrown. Think of a fireball or a flame from a torch being swung. It is about showing speed and impact, more or less.
This type of flame requires you to think about how fire looks when it is moving quickly. It is a really fun challenge, and the results can be quite dramatic. You are not just drawing fire, you are drawing fire in action, you see.
Step 1: Dynamic Motion Lines
Instead of a single, stable shape, start with a more elongated, sweeping form. Imagine the path the flame is taking, and draw a curved, almost streaky shape to represent its movement. This initial shape should convey speed and direction, typically.
You can even add some faint, trailing lines behind the main flame shape to suggest its rapid movement. These lines are not part of the flame itself, but they help show its path through the air. It is like drawing a blur, in a way, to show speed.
Step 2: Trailing Embers
As a thrown flame moves, it often leaves behind tiny, glowing embers. Draw small, bright dots and dashes of red and orange trailing behind the main flame body, along its path. These embers add to the sense of motion and heat, you know?
Some embers might be brighter than others, and they can vary in size. They help to show the energy being left behind as the flame travels. It is a really effective way to make your thrown flame feel powerful, honestly.
Step 3: Intense Colors
For a thrown flame, you want the colors to be very vibrant and intense. Use bright yellows and oranges for the core, blending quickly into reds and even some darker, almost burnt-looking oranges at the very edges, especially where it is being thrown from. The contrast makes it look more powerful, you see.
The blending can be less smooth than a stationary flame, perhaps with some sharper transitions to show the turbulence of the moving fire. This helps convey the raw energy of the flame. You might even add a slight dark outline to some parts to make the bright colors pop even more, apparently.
Tips for Making Your Fire Look Real
Making your drawn fire look real involves a few key ideas beyond just the shapes and colors. These ideas focus on how fire behaves in the world, and understanding them will really help your drawings, you know?
Think About Transparency
Fire is not solid; you can often see through parts of it, especially the cooler, outer edges. When you are layering your colors, try to make the outermost red and orange layers slightly transparent, if your drawing medium allows. This helps create that wispy, ethereal quality of real flames, actually.
In digital art, you can use opacity settings to achieve this effect. If you are using traditional media, a light wash or a gentle touch with your coloring tools can work. It is about showing that fire is mostly hot gas, you know, not a solid object.
Light Interaction
Fire gives off light, and that light affects everything around it. Think about where the light from your flame would hit objects nearby, like logs, walls, or even people. Add subtle glows or highlights to these areas, using warm colors like yellow or orange. This makes your fire feel like a real light source, more or less.
Conversely, areas further away from the fire

How to Draw Flames | Fire drawing, Drawing flames, Drawing tutorial
How to Draw Fire - Easy Drawing Tutorial For Kids

11 Easy Fire Drawing Ideas - How To Draw Fire - Julie Ann Art
