Building Your Own Raspberry Pi Remote Control IoT App: A Guide For Accessible Smart Living
Imagine a world where you can adjust your home's lighting, check on a pet, or monitor environmental conditions from anywhere, all with a simple tap on your phone. This isn't just a dream, it's something very real and quite achievable with a Raspberry Pi remote control IoT app. The Raspberry Pi, a small but mighty computer, really makes computing accessible and affordable for everybody, from folks working in big industries to the person tinkering at their kitchen table, or even a student learning to code in a classroom. It's a wonderful tool for making smart things happen around you.
These tiny computers open up a whole universe of possibilities for controlling things around us. They are a fantastic starting point for anyone keen on creating their own smart devices, perhaps even if you are just starting to learn coding for kids, teenagers, and young adults. The Raspberry Pi Foundation, a UK registered charity, actually provides access to online coding resources and challenges that are free for everyone anywhere, which is pretty neat.
So, if you've ever thought about bringing your living space into the future, or just want to build something cool and practical, making a remote control IoT app with a Raspberry Pi is a great way to go. It allows you to write powerful programs and build exciting physical computing projects with help from a team of expert educators, which is a big plus. We will explore how these small computers can turn your ideas into a working reality, letting you take charge of your environment in new ways.
- Lucy Heartfilia Age
- Overime Megan Erome
- Tucci Actor
- Candice Bergen Net Worth
- Michelle Burroughs Dazed And Confused
Table of Contents
- Why a Raspberry Pi for Remote Control IoT?
- Getting Started with Your Raspberry Pi
- Core Concepts of a Raspberry Pi Remote Control IoT App
- Planning Your First IoT Project
- Building Your App: Step-by-Step Approach
- Real-World Applications and Learning
- Common Questions About Raspberry Pi IoT
- Looking Ahead
- Conclusion
Why a Raspberry Pi for Remote Control IoT?
You might be wondering, "Why a Raspberry Pi?" Well, there are many reasons, but the main one is that Raspberry Pi computers, from industries large and small, to the kitchen table tinkerer, to the classroom coder, raspberry pi holdings plc make computing accessible and affordable for everybody. This little device is a truly powerful tool for anyone wanting to get into building smart devices.
Making Computing Accessible
One of the biggest strengths of the Raspberry Pi is how it helps everyone get started with computing, and that is a pretty big deal. It's not just for computer experts; it's for anyone who wants to learn. This means that whether you are a young person wanting to create games, animations, and more with code, or an adult looking to try out a new hobby, the Raspberry Pi is a welcoming platform. It helps make complex ideas feel much more approachable, which is nice.
The Raspberry Pi Foundation, which is a UK company limited by guarantee and a charity registered in England and Wales with number 1129409, works hard to make these tools available. They even have groups like CoderDojo Foundation and Raspberry Pi Foundation North America, Inc. that help spread this knowledge. So, it's not just about the hardware; it's about the entire ecosystem built around learning and sharing, which is quite helpful.
The Power of Raspberry Pi OS
When you get a Raspberry Pi, you'll likely use Raspberry Pi OS. This operating system is actually under continual development, which means it's always getting better. It's built on Debian, a very stable and well-known system, but Raspberry Pi OS itself is tailored for these small computers. It is recommended for most Raspberry Pi use cases, and that's for a good reason.
This operating system supports over 35,000 Debian packages, which is a huge number. This means you have access to a vast collection of software and tools right out of the box. You can, for instance, find almost anything you need for programming, networking, or even setting up a web server for your IoT app. This wide range of options makes it very flexible for all sorts of projects, you know.
Beyond the Basics: Cameras and AI
The Raspberry Pi is not just for simple tasks; it can handle more advanced things too. For example, you can connect the HQ Camera or Camera Module to it with the included ribbon cable. You just need to locate the correct camera socket on your Raspberry Pi, labelled ‘CAMERA’ (or ‘CSI’ on some models), with the Raspberry Pi turned off, and that's pretty simple to do.
This camera capability means you could, say, build an IoT app that lets you see what's happening in another room remotely, or even monitor your garden. Furthermore, there's a growing focus on AI literacy. AI literacy isn’t just about understanding the technology — it’s about fostering critical conversations on how to integrate AI. So, you could even start exploring how to add some basic AI features to your remote control app, perhaps for object detection or smart notifications, which is rather interesting.
Getting Started with Your Raspberry Pi
Getting started with your Raspberry Pi computer for free is surprisingly straightforward. It just takes a few steps to get everything ready to begin building your remote control IoT app. You don't need a lot of fancy equipment to begin, which is a nice thing.
Choosing Your Pi and Storage
First off, you'll need a Raspberry Pi model. There are several versions, each with different capabilities and price points. For most remote control IoT applications, even a smaller, more affordable model can work perfectly fine. The key is to pick one that meets your project's specific needs, like if you need more processing power or more memory.
One important thing to remember is that Raspberry Pi models lack onboard storage, so you have to supply it. This usually means using a microSD card. You can boot your Raspberry Pi from an operating system image installed on any supported media, but microSD cards are the most common and easiest to use. Make sure you get a good quality card with enough space, perhaps 16GB or 32GB, which is usually plenty for most projects.
Setting Up Raspberry Pi OS
Once you have your Raspberry Pi and a microSD card, the next step is to install Raspberry Pi OS. The official documentation for Raspberry Pi computers and microcontrollers provides clear instructions on how to do this. You typically download an image file and then write it to your microSD card using a special tool, like Raspberry Pi Imager.
This process is quite simple, and there are many guides available online, including those from the Raspberry Pi Foundation. After a lot of work updating packages and testing, they are now at a point where the packages in their public Trixie repo can be used to update a Bookworm image to Trixie, and they are herewith providing the instructions to do so. This shows how much effort goes into keeping the OS current and user-friendly, which is very helpful for everyone.
Core Concepts of a Raspberry Pi Remote Control IoT App
To really get a handle on building your own remote control IoT app, it's helpful to understand a few basic ideas. These concepts are the building blocks that let your Raspberry Pi talk to your phone and control things in the real world, and they are quite important.
What is an IoT App, Anyway?
An IoT app, or Internet of Things app, is basically a piece of software that allows you to interact with physical devices over a network, usually the internet. Think of it as a bridge between your digital world (your phone or computer) and the physical world (your lights, sensors, or motors). For instance, it lets you press a button on your phone and have a light turn on in your living room, which is pretty cool.
With a Raspberry Pi, this app can be something you build yourself. It could be a simple web page you access from any browser, or a dedicated application you install on your smartphone. The main idea is to send commands to your Raspberry Pi, which then carries out the action you want. It's about making everyday objects "smart" and controllable from a distance, which is a very powerful concept.
Communication Methods
For your Raspberry Pi remote control IoT app to work, your Pi needs a way to communicate. The most common methods are Wi-Fi and Bluetooth. Wi-Fi is great because it allows your Pi to connect to your home network and, through that, to the internet, letting you control things from anywhere in the world. This is how most remote control apps operate, you know.
Bluetooth, on the other hand, is good for shorter distances, perhaps for controlling something in the same room without needing an internet connection. Many Raspberry Pi models come with built-in Wi-Fi and Bluetooth, making it very convenient to set up these connections. Choosing the right communication method depends on what you want your app to do and how far away you need to control your devices, which is something to consider.
The Role of Programming
At the heart of any IoT app is programming. This is where you tell your Raspberry Pi exactly what to do. Python is a very popular choice for Raspberry Pi projects because it's relatively easy to learn and incredibly versatile. You can write powerful programs and build exciting physical computing projects with our team of expert educators, using languages like Python.
Learning to code for kids, teenagers, and young adults is made easier with resources from the Raspberry Pi Foundation. They provide access to online coding resources and challenges that are free for everyone anywhere. This means you can create games, animations, and more with code, and then apply those same coding skills to your IoT app. It's about giving instructions to the computer so it can perform the actions you desire, which is quite fundamental.
Planning Your First IoT Project
Before you start writing any code, it's a good idea to plan out your first Raspberry Pi remote control IoT app project. A little bit of planning can save you a lot of time and effort down the road. It helps you clarify what you want to achieve, which is pretty important.
Identifying Your Needs
Think about what problem you want to solve or what convenience you want to add to your life. Do you want to turn off lights when you're not home? Do you want to monitor the temperature in your child's room? Or perhaps you'd like to automate your plant watering system? Identifying a clear need will help you focus your project, which is a good first step.
Consider what devices you want to control or monitor. Will it be a simple on/off switch, or something more complex like dimming lights or reading sensor data? Knowing this will guide your choice of components and the complexity of your code. It's about starting with a clear goal in mind, you know.
Simple Project Ideas
For a first project, keeping it simple is often the best approach. Here are a few ideas that are quite popular and manageable for beginners:
- Remote Light Control: This is a classic. You can use a Raspberry Pi to switch a lamp on or off from your phone. It teaches you how to control a basic electrical component.
- Temperature Monitor: Connect a temperature sensor to your Pi and read the data remotely. This lets you see the current temperature in a room from anywhere.
- Door Sensor Alert: Attach a magnetic contact sensor to a door or window. Your Pi can send you a notification if it opens unexpectedly.
- Pet Feeder Automation: A slightly more advanced project, but very rewarding. You could program your Pi to dispense pet food at specific times, or even on command from your app.
These projects help you get comfortable with the basics before moving on to more complex systems. They are a good way to apply what you learn about computer coding for kids, teenagers, and young adults, and really see your code in action, which is very motivating.
Building Your App: Step-by-Step Approach
Now, let's get into the exciting part: actually building your Raspberry Pi remote control IoT app. This involves a few key steps, from setting up remote access to writing the code and creating your control interface. It's a bit like putting together a puzzle, where each piece fits together to make the whole system work.
Setting Up Remote Access
To control your Raspberry Pi from afar, you'll need to set up remote access. The simplest way for many is to use SSH (Secure Shell). This lets you connect to your Pi's command line from another computer or even your phone, as long as both are on the same network or you have set up port forwarding on your router for external access. The official documentation for Raspberry Pi computers and microcontrollers can guide you through enabling SSH.
For a more user-friendly graphical interface, you could use VNC (Virtual Network Computing). This allows you to see and interact with your Raspberry Pi's desktop environment as if you were sitting right in front of it. Both methods are quite secure if set up correctly and are essential for controlling your Pi without a monitor, keyboard, and mouse always connected, which is very convenient.
Writing the Raspberry Pi Code
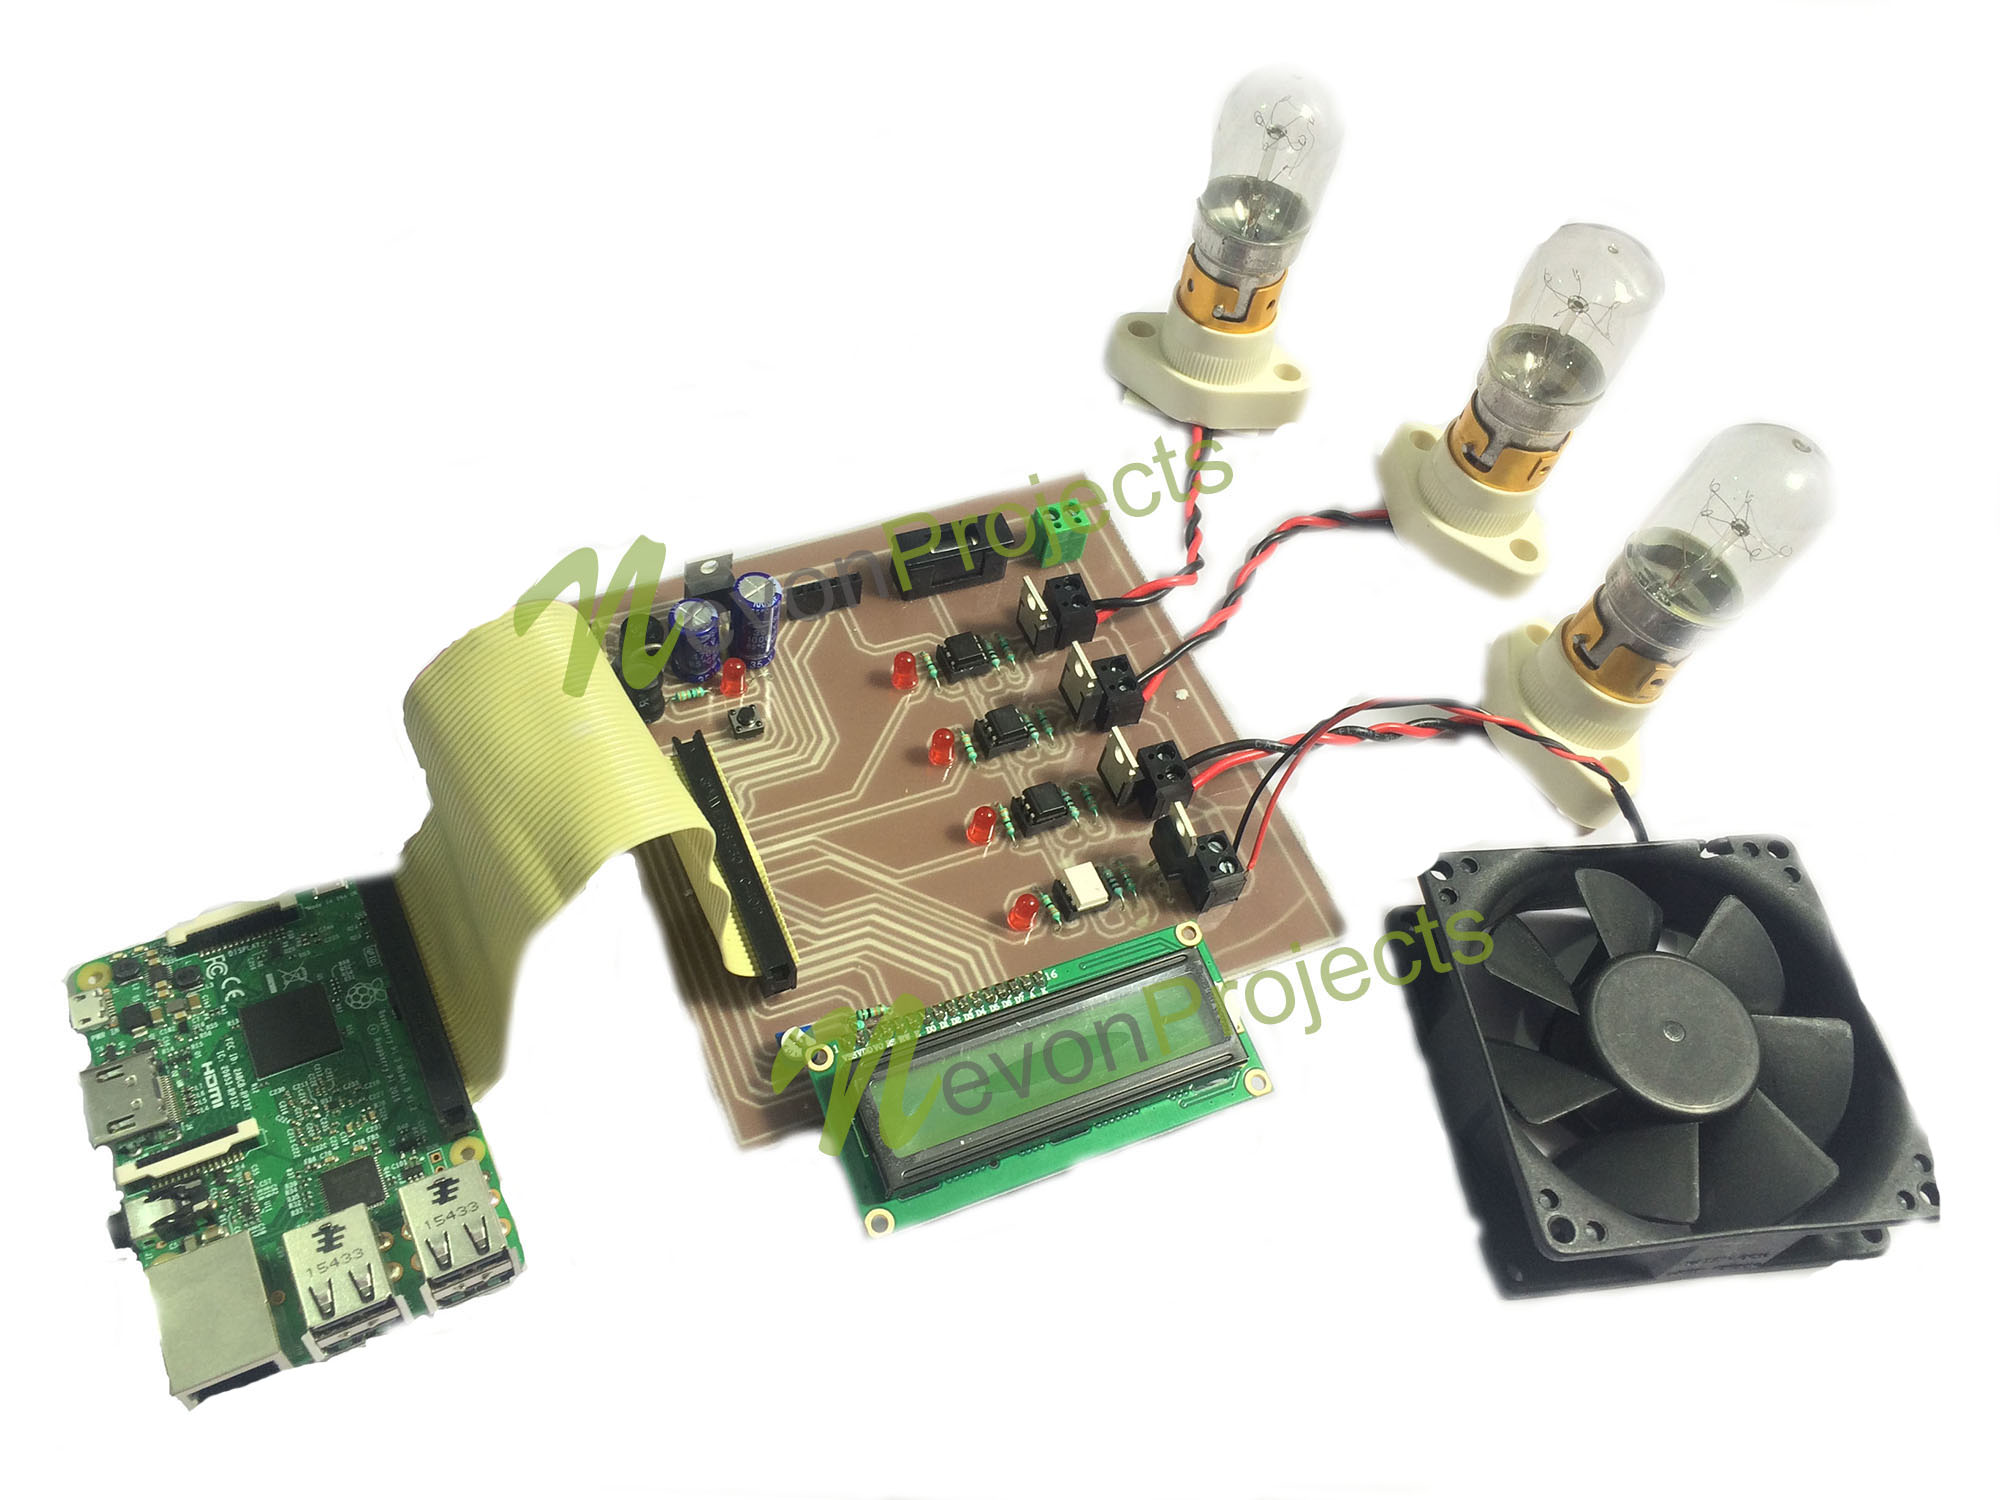
This is where your programming skills come into play. Most Raspberry Pi IoT projects use Python because it's easy to read and has many libraries for interacting with hardware. You'll write scripts that tell your Pi what to do when it receives a command from your app. For example, a script might turn on a specific GPIO pin to activate a relay, which then turns on a light.
You can create games, animations, and more with code, and those same coding principles apply here. Your code will listen for incoming commands, process them, and then perform the desired action on the connected hardware. This is where the real magic happens, as you translate your intentions into actions for the physical world. It's pretty cool to see your code make something happen, you know.
Creating Your Control Interface
Your control interface is what you'll use to send commands to your Raspberry Pi. This could be a simple web page, a mobile app, or even a voice assistant integration. For beginners, a web-based interface is often the easiest to start with. You can use basic HTML, CSS, and JavaScript to create buttons or sliders that, when pressed, send a command to your Raspberry Pi's web server.
There are also frameworks and platforms that simplify this, like Node-RED, which allows you to build interfaces with minimal coding, using a visual programming approach. For mobile apps, you might use frameworks like Kivy (for Python) or explore app development platforms. The choice depends on your comfort level with programming and what kind of user experience you want to create, which is something to consider.
Connecting Physical Components
Finally, your Raspberry Pi needs to connect to the actual things you want to control or monitor. This involves using the GPIO (General Purpose Input/Output) pins on your Raspberry Pi. These pins allow your Pi to send and receive electrical signals, which is how it talks to other electronic components.
For example, to control a light, you might connect a relay module to a GPIO pin. When your app sends a command to turn on the light, your Raspberry Pi's code will tell that specific GPIO pin to go "high," activating the relay and turning on the light. It's about making the digital world interact with the physical one, which is very much the essence of IoT. Always be careful when working with electrical components, and maybe double-check your wiring, you know.
Real-World Applications and Learning
The beauty of a Raspberry Pi remote control IoT app is not just in building it, but in the practical uses it offers and the learning journey it provides. These small computers are truly versatile, and their applications stretch far and wide.
Home Automation for Everyone
One of the most popular uses for a Raspberry Pi IoT app is home automation. You can create a system that controls your lights, thermostat, security cameras, or even your coffee maker. This allows you to manage your home environment more efficiently, save energy, and add a layer of convenience to your daily life. It's about making your home smarter and more responsive to your needs, which is a big benefit.
Because Raspberry Pi holdings plc make computing accessible and affordable for everybody, building your own home automation system becomes a realistic goal for almost anyone. You don't need expensive, proprietary smart home hubs; you can build a system tailored exactly to your preferences using open-source tools and your own creativity. This gives you a lot more control and flexibility, which is really nice.
Educational Opportunities
Beyond practical applications, creating a Raspberry Pi remote control IoT app is an incredible learning experience. It combines programming, electronics, and problem-solving in a very tangible way. The Raspberry Pi Foundation provides access to online coding resources and challenges that are free for everyone anywhere, making it a fantastic educational tool.
Learning computer coding for kids, teenagers, and young adults is a core mission, and projects like these help solidify those skills. Our new certificate in applied computing equips students with essential digital skills that prepare them for further study or the modern workforce. So, by building an IoT app, you're not just creating a gadget; you're gaining valuable skills that are highly sought after in today's world, which is very important.
Community and Resources
You're never alone on your Raspberry Pi journey. There's a massive, supportive community of users, developers, and educators worldwide. If you run into a problem or need inspiration, you can find forums, blogs, and online groups dedicated to Raspberry Pi projects. The official documentation for Raspberry Pi computers and microcontrollers is also an invaluable resource.
This community aspect means you can learn from others, share your projects, and get help when you're stuck. It's a truly collaborative environment that fosters creativity and continuous learning. So, you know, there's always someone out there who might have faced a similar challenge and can offer some guidance, which is quite reassuring.
You can learn more about Raspberry Pi projects on our site, and find more detailed guides on building specific IoT applications here.
Common Questions About Raspberry Pi IoT
When thinking about a Raspberry Pi remote control IoT app, some common questions often come up. It's good to address these directly, as they can help clarify some initial uncertainties people might have.
Can a Raspberry Pi be used for home automation?
Absolutely, yes! A Raspberry Pi is a very popular choice for home automation projects. Its small size, low power consumption, and versatility make it ideal for controlling lights, sensors, and other smart devices around your home. Many people build entire home automation systems using a Raspberry Pi as the central hub, which is pretty common these days.
What is the best way to remotely control a Raspberry Pi?
The "best" way really depends on what you want to do. For command-line access, SSH is often the preferred method because it's secure and efficient. If you need a full graphical desktop experience, VNC is an excellent choice. For building a dedicated remote control IoT app, you'll likely use a combination of programming on the Pi (like Python) and a custom web interface or mobile app to send commands, which is often the most flexible approach.
What is an IoT app for Raspberry Pi?
An IoT app for Raspberry Pi is a software application that lets you interact with physical devices connected to your Raspberry Pi over a network, usually the internet. It acts as a bridge, allowing you to send commands to your Pi (e.g., "turn on light") and receive data from it (e.g., "current temperature") from a remote location, using your smartphone or another computer. It's basically a custom interface for your smart home or physical computing projects, which is very useful.
Looking Ahead
The world of Raspberry Pi and IoT is always growing and changing. With continuous development of Raspberry Pi OS, and the constant release of new hardware and software tools, there's always something new to learn or try. The focus on AI literacy, for example, shows how these small computers are staying relevant with the latest technological advancements. It's an exciting time to be involved in this field, which is very true.
As you gain more experience, you might even look into more complex projects, perhaps integrating voice control, or building more sophisticated sensor networks. The possibilities are nearly endless, limited only by your imagination and a bit of coding effort. It's a journey of continuous discovery and creation, you know.
Conclusion
Creating a Raspberry Pi remote control IoT app is a rewarding experience that puts the power of smart technology right into your hands. It's a testament to how Raspberry Pi Holdings PLC make computing accessible and affordable for everybody, truly empowering individuals to build, learn, and innovate. From controlling simple lights to monitoring complex environments, your Raspberry Pi is a versatile tool ready for your ideas.
We've explored why the Raspberry Pi is such a great choice, how to get started, the core concepts behind IoT apps, and how to plan and build your own projects. Remember, the Raspberry Pi Foundation provides a wealth of free resources to help you along the way. So, why not get started with your Raspberry Pi computer for free today and begin building your very own smart solutions? The future of accessible smart living is truly within your reach.
- Leonardo Dicaprio Ex Wife
- Eartha Kitt Batman
- Gta San Andreas Frank
- Claudia Jessie Instagram
- Who Pays For Celebrity Iou

Remote Desktop for Raspberry Pi and other IoT devices

Implementing IoT remote device control on Raspberry Pi's RP2040 + W5500
IOT Home Automation Using Raspberry Pi
