Petulla Recept: Your Guide To Making Delicious Albanian Fried Dough Today
There's something truly special, you know, about food that brings back happy memories. It’s that warm, comforting feeling that wraps around you, a bit like a favorite blanket on a cool evening. For many, that feeling comes from a simple, yet utterly delightful, treat called Petulla. This isn't just any fried dough; it's a taste of tradition, a whisper of home, and a truly lovely way to share joy with people you care about.
Petulla, a cherished staple in Albanian cooking, is a type of fried dough that is very popular. You might find it served for breakfast, as a snack, or even as a light meal, depending on what you put on it. It’s incredibly versatile, too, which is great. You can have it sweet with honey or powdered sugar, or savory with cheese or yogurt. It’s a dish that really shows off how simple ingredients can make something quite amazing.
So, if you've ever wanted to make this wonderful treat yourself, you're in the right spot. We're going to walk you through everything you need to know to create perfect Petulla right in your own kitchen. We’ll cover the classic petulla recept, some helpful hints, and even a few different ways to enjoy them. This guide will help you get those golden, fluffy bites just right, almost like magic.
- 607 Unc
- Mallory Wells
- Do Cupcakes Need To Be Refrigerated
- Where Is Charles Lindbergh Buried
- Criminal Minds Episodes
Table of Contents
- What is Petulla? A Comforting Tradition
- Gathering Your Goodies: The Petulla Recept Ingredients
- Mixing It Up: Crafting Your Petulla Dough
- Proofing Your Creation: Letting the Dough Rest
- Shaping Your Petulla: Getting Them Ready to Fry
- The Fry Zone: Cooking Your Petulla to Golden Perfection
- Serving Suggestions: Enjoying Your Fresh Petulla
- Petulla Recept Variations to Try
- Common Questions About Petulla (FAQs)
What is Petulla? A Comforting Tradition
Petulla is, basically, a type of fried dough, but it’s so much more than that. It holds a very special spot in the hearts of many people from Albania and Kosovo, and it's also quite popular in other Balkan areas. Think of it as a cousin to the donut or fritter, yet it has its own distinct charm and texture. It's often lighter, with a satisfying chew, and a lovely golden outer layer.
For generations, families have made Petulla for all sorts of occasions. It’s a dish that often brings people together, you know, around the table, sharing stories and laughter. It can be a simple morning meal, a quick afternoon snack, or even a delightful dessert after a larger meal. The simple ingredients make it accessible, and the process of making it can be a very calming experience, honestly.
The beauty of Petulla lies in its humble beginnings and its ability to adapt. You can enjoy it plain, or dress it up with all sorts of things. This makes it a truly versatile dish, and a real crowd-pleaser for nearly anyone. It’s a perfect example of how traditional cooking can still be very relevant and enjoyed in our busy lives today.
- Interstellar 2
- Best Ssh To Iot Device Aws
- Xev Bellringer Alternatives
- Birkdale Movies
- Jen Landon Frères Et Sœurs
Gathering Your Goodies: The Petulla Recept Ingredients
To make wonderful Petulla, you don't need a huge list of fancy items. The ingredients are quite simple, which is part of what makes this petulla recept so appealing. You probably have most of these things in your kitchen right now, which is pretty convenient. Getting everything ready before you start mixing will make the whole process go much smoother, you know.
What You'll Need:
- **All-purpose flour:** About 3 cups (around 360 grams). This is the main building block for your dough.
- **Warm water:** About 1 ½ cups (around 360 ml). The warmth helps the yeast activate properly, which is quite important.
- **Active dry yeast:** 1 packet (about 2 ¼ teaspoons or 7 grams). This is what makes your Petulla light and airy.
- **Sugar:** 1 tablespoon. Just a little bit helps the yeast, and adds a slight sweetness to the dough.
- **Salt:** 1 teaspoon. This balances the flavors and brings out the best in the dough, really.
- **Vegetable oil or other neutral oil:** Several cups for frying. You need enough to let the Petulla float.
Tips for Ingredient Selection:
When choosing your ingredients, aim for freshness, especially with the yeast. Fresh yeast will give you a better rise, which is a big deal for fluffy Petulla. For the flour, a good quality all-purpose flour works perfectly well. You don't need anything special, just a standard kitchen staple. And for the oil, a neutral-tasting one like canola, sunflower, or vegetable oil is best, so it doesn't overpower the Petulla's flavor, you see.
Make sure your water is warm, but not hot. Water that is too hot can kill the yeast, and then your dough won't rise, which is a bit of a bummer. Think of it as bathwater warm, just comfortable to the touch. This simple detail can make a big difference in how your Petulla turn out, almost like a secret trick.
Mixing It Up: Crafting Your Petulla Dough
Now, let's get to the fun part: making the dough. This is where your ingredients come together to form the base of your delicious Petulla. It’s a fairly straightforward process, but paying a little attention to detail here will help you achieve the perfect texture. You want a dough that is soft and easy to work with, but not too sticky, you know.
Step-by-Step Dough Making:
- **Activate the Yeast:** In a large mixing bowl, combine the warm water, sugar, and yeast. Give it a gentle stir. Let this sit for about 5-10 minutes. You should see it get a little foamy on top; that tells you the yeast is alive and ready to work, which is pretty cool.
- **Add Dry Ingredients:** Once your yeast is bubbly, add the salt and about half of the flour to the bowl. Mix this with a wooden spoon or a sturdy spatula until it’s combined. It might look a bit lumpy at first, but that’s okay.
- **Gradually Add Remaining Flour:** Slowly add the rest of the flour, a little at a time, mixing as you go. You might not need all of the flour, or you might need a tiny bit more. The goal is a soft, somewhat sticky dough that pulls away from the sides of the bowl. It should feel pliable, almost like a soft cloud.
- **Knead Briefly:** Once the dough comes together, turn it out onto a lightly floured surface. Knead it for just a few minutes, maybe 3 to 5 minutes. You're not looking for a super smooth, elastic dough like for bread; just enough to bring it all together and make it a bit more cohesive. It should feel springy, you know.
Troubleshooting Common Dough Issues:
Sometimes, your dough might feel a little off, and that's perfectly normal. If it’s too sticky to handle, add a very small amount of flour, like a tablespoon at a time, until it’s manageable. If it feels too stiff or dry, you can add a tiny splash of warm water, just a teaspoon at a time, until it softens up. It's a bit of a balancing act, really, but you'll get the feel for it. Just keep at it, and you'll find the right consistency, which is often a matter of touch.
The dough should be soft enough that when you press it gently, it springs back slowly. If it doesn't spring back, it might be too wet. If it's too hard to press, it's likely too dry. This feel is something you get with practice, but it's not overly complicated. It's almost like learning a new dance step, you know, you get better with each try.
Proofing Your Creation: Letting the Dough Rest
After you’ve mixed and kneaded your dough, the next very important step is letting it rest. This process, often called proofing, is where the yeast does its magical work, making the dough light and airy. It’s a moment of patience, but it’s absolutely worth it for the final texture of your Petulla. You want the dough to grow in size, you see, to become plump and full of tiny air bubbles.
How to Proof Your Dough:
- **Prepare the Bowl:** Lightly oil a clean, large mixing bowl. This keeps the dough from sticking as it rises.
- **Place the Dough:** Put your dough into the oiled bowl, then turn it over once to coat the top with a little oil. This stops a dry skin from forming.
- **Cover and Rest:** Cover the bowl with a clean kitchen towel or plastic wrap. Place it in a warm spot in your kitchen, away from drafts. A warm oven (turned off, but perhaps preheated slightly and then turned off) or a sunny windowsill can work well.
- **Wait for the Rise:** Let the dough rise for about 1 to 1 ½ hours, or until it has more or less doubled in size. The exact time depends on the warmth of your room. It should look noticeably bigger and feel quite puffy when it’s ready.
Tips for Ideal Proofing Conditions:
A consistent warm temperature is quite helpful for proofing. If your kitchen is cool, your dough will take longer to rise, which is perfectly fine. Don't rush it. The key is to let the yeast work at its own pace. Some people even put their bowl in a slightly warm, turned-off oven, which is a rather good trick for a steady environment. This helps the dough get that lovely, airy structure that makes Petulla so delightful, really.
You can tell your dough is ready when you gently poke it with a floured finger, and the indentation stays. If it springs back right away, it needs a little more time. If it collapses, it might be over-proofed, but for Petulla, a slight over-proof isn't usually a big problem. Just try to catch it when it's just right, you know, plump and happy looking.
Shaping Your Petulla: Getting Them Ready to Fry
Once your dough has risen beautifully, it's time to shape your Petulla. There are a few ways to do this, and the method you choose can affect the final look and feel of your fried dough. The goal is to create pieces that are fairly even in size so they cook uniformly. This step is where your Petulla really starts to take its familiar form, which is quite exciting.
Methods for Shaping:
- **The Pull and Tear Method (Traditional):** This is a very common way. Lightly oil your hands. Gently pull off small pieces of dough, about the size of a golf ball or slightly larger. With your oiled hands, gently stretch each piece into a rough circle or oval, creating a thin center and slightly thicker edges. Some people even make a small hole in the middle, similar to a donut.
- **The Rolling and Cutting Method:** Lightly flour your work surface. Gently pat or roll out the dough to about ½ inch thickness. Use a knife or a pizza cutter to cut the dough into squares, rectangles, or even diamond shapes. This method can give you more uniform pieces, which is nice if you prefer a neat look.
Tips for Consistent Size and Shape:
No matter which method you pick, try to make your Petulla roughly the same size. This helps them cook evenly in the hot oil. If some are much thicker than others, the thicker ones might not cook all the way through, while the thinner ones could get too crisp. Consistency is key here, you know, for a good batch. Lightly oiling your hands for the pull-and-tear method is pretty helpful; it stops the dough from sticking to you.
You can also experiment with making them a little thinner or thicker to see what you like best. Thinner Petulla will be crispier, while thicker ones will be softer and chewier inside. It's all about personal preference, really. Just remember to handle the dough gently to keep all those lovely air bubbles that formed during proofing, as those contribute to the light texture.
The Fry Zone: Cooking Your Petulla to Golden Perfection
Frying is the moment of truth for your Petulla. This is where they transform from soft dough into golden, puffy, and utterly delicious treats. Getting the oil temperature just right is very important here. Too cool, and your Petulla will soak up too much oil and be greasy. Too hot, and they'll brown too quickly on the outside, leaving the inside uncooked, which is not what we want.
Frying Steps:
- **Heat the Oil:** Pour enough vegetable oil into a large, deep pot or a Dutch oven so that it's at least 2-3 inches deep. Heat the oil over medium-high heat. You want the temperature to be around 350-375°F (175-190°C). If you have a thermometer, use it; it's quite helpful. If not, you can test it by dropping a tiny piece of dough into the oil. It should sizzle immediately and float to the surface within a few seconds.
- **Fry in Batches:** Carefully place a few shaped Petulla into the hot oil. Don't overcrowd the pot; fry them in batches so the oil temperature doesn't drop too much. Give them space to puff up and cook evenly.
- **Cook Until Golden:** Let them fry for about 2-3 minutes per side, or until they are a lovely golden-brown color and look puffed up. Use tongs or a slotted spoon to flip them over.
- **Drain Well:** Once they are golden on both sides, take them out of the oil using a slotted spoon. Place them on a plate lined with paper towels to drain any extra oil. This helps them stay crisp, you know, and not greasy.
Tips for Perfect Frying:
Maintaining a consistent oil temperature is rather key. If you don't have a thermometer, keep an eye on how quickly they brown. If they're browning too fast, turn the heat down a little. If they're not browning at all, turn it up. It’s a bit of an art, but you'll get the hang of it. And always be careful when working with hot oil, of course. It's important to use a pot that is deep enough to prevent oil from splattering over the sides, too. Also, make sure your Petulla are not too thick, as that can make them hard to cook through without burning the outside.
As you fry, the oil temperature might drop slightly with each batch. So, give it a moment to come back up to temperature between batches. This ensures each piece gets the same great cooking. This attention to detail will really make your Petulla shine, almost like a professional touch. The aroma of them frying is pretty wonderful, too.
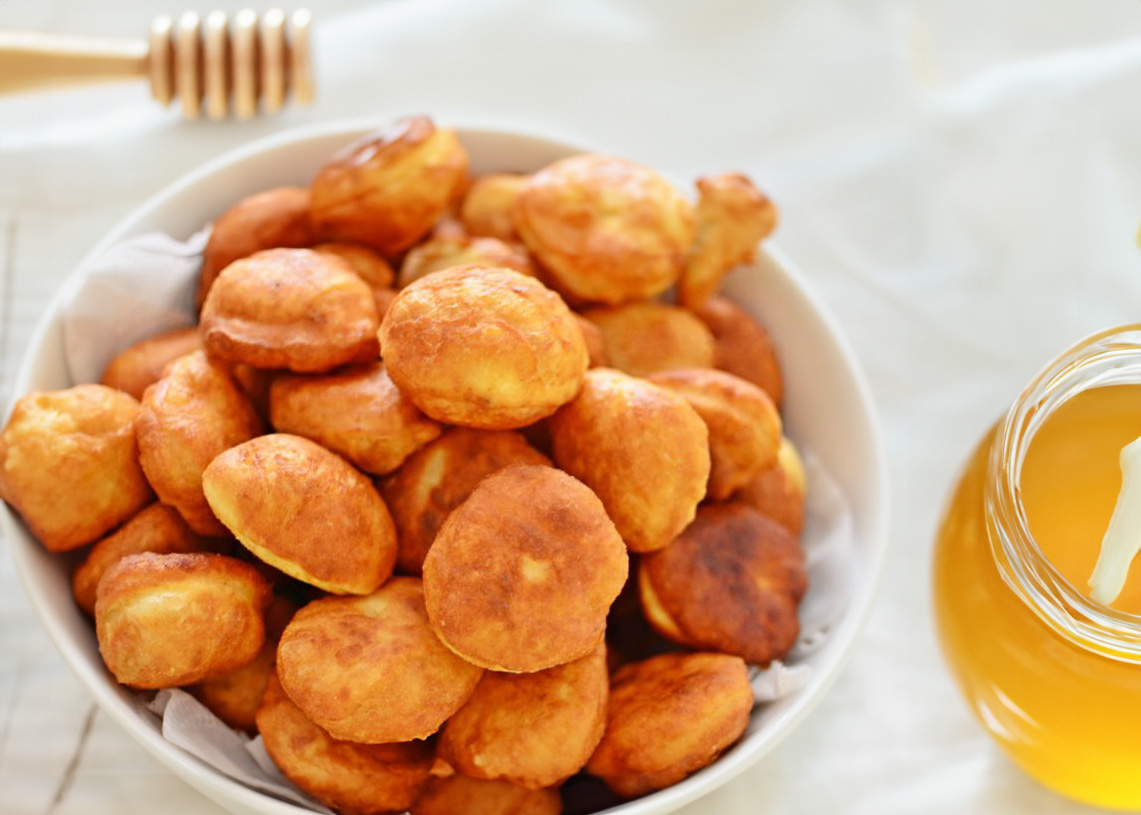
Serving Suggestions: Enjoying Your Fresh Petulla
Once your Petulla are golden and drained, they are ready to be enjoyed! This is where you can truly make them your own, as they are incredibly versatile. Whether you like sweet or savory, there's a perfect topping for your fresh fried dough. Serving them warm is always best, as that's when they are at their softest and most flavorful. So, gather your favorite toppings, and get ready for a treat.
Sweet Options:
- **Honey or Syrup:** A drizzle of honey or your favorite syrup is a classic choice. It adds a lovely sweetness that pairs so well with the simple dough.
- **Powdered Sugar:** A light dusting of powdered sugar makes them look beautiful and adds a gentle sweetness. This is very popular, you know.
- **Jam or Fruit Preserves:** Any fruit jam, like strawberry, apricot, or plum, makes for a delightful topping.
- **Chocolate Hazelnut Spread:** For a more indulgent treat, a dollop of chocolate hazelnut spread is always a good idea.
- **Cinnamon Sugar:** A simple mix of cinnamon and sugar sprinkled over warm Petulla is wonderfully aromatic and tasty.
Savory Options:
- **Feta Cheese:** Crumbled feta cheese is a very traditional savory pairing. The salty cheese contrasts beautifully with the dough.
- **Plain Yogurt:** A dollop of plain yogurt, perhaps with a pinch of salt, can be a refreshing and tangy accompaniment.
- **Ajvar:** This roasted red pepper and eggplant spread is a popular Balkan condiment that offers a rich, savory flavor.
- **Salty Cheese and Herbs:** Some people like to serve them with a spread of a soft, salty cheese mixed with fresh herbs like dill or parsley.
You can even serve a mix of sweet and savory options on the table, allowing everyone to pick their favorites. Petulla are often shared among family and friends, making them a perfect addition to a relaxed breakfast or brunch. The joy of sharing these warm, fluffy bites is a big part of the experience, honestly. So, gather your loved ones and enjoy your homemade creations.
Petulla Recept Variations to Try
The classic petulla recept is wonderful as it is, but there are always ways to play around with it and make it your own. Trying out different additions can add new layers of flavor and texture, which is pretty fun. These variations keep the spirit of Petulla while giving you a little something different to enjoy. It’s a way to keep things fresh, you know.
Flavorful Additions to the Dough:
- **Vanilla Extract:** Add a teaspoon of vanilla extract to the dough for a subtle, sweet aroma, especially if you plan to serve them with sweet toppings.
- **Citrus Zest:** A bit of lemon or orange zest can brighten up the dough with a fresh, zesty note. This is particularly nice for a morning treat.
- **Spices:** A pinch of cinnamon, nutmeg, or even a tiny bit of cardamom in the dough can give it a warm, inviting flavor.
- **Yogurt or Milk:** Some Petulla recipes use a little plain yogurt or milk instead of some of the water. This can make the dough a bit richer and softer. If you use yogurt, consider reducing the water slightly.
Dietary Adaptations:
For those with specific dietary needs, you might be able to adjust the recipe. While traditional Petulla uses wheat flour, experimenting with gluten-free flour blends could work, though the texture might be slightly different. For a vegan version, the standard recipe is often already vegan, as it typically uses water, flour, yeast, sugar, and salt. Just ensure your oil is plant-based, which is usually the case. These small changes can make the recipe accessible to more people, which is quite nice.
Remember that when you change ingredients, especially the flour, you might need to adjust the liquid amount slightly to get the right dough consistency. It's a bit of an experiment, but it can lead to some very satisfying results. Don't be afraid to try new things, really; that's how new favorites are discovered. Just like trying to fix a computer program, sometimes a little adjustment is all it takes to get things running smoothly.
Common Questions About Petulla (FAQs)
People often have questions when they're making something new, and Petulla is no different. Here are some common things people wonder about, which might help you out too. Knowing these answers can make your cooking experience much smoother, you know, and help you get the best results possible.
Q1: Can I make Petulla dough ahead of time?
Yes, you certainly can. After the first rise, you can punch down the dough, cover it tightly, and put it in the refrigerator for up to 24 hours. When you're ready to fry, take it out and let it come to room temperature for about 30-60 minutes before shaping and frying. This can make preparing them much more convenient, which is pretty handy for busy days.
Q2: Why aren't my Petulla puffing up?
There are a few reasons this might happen. The most common one is that your yeast might not be active enough, or the water you used was too hot or too cold. Also, the oil temperature during frying is very important. If the oil isn't hot enough, they won't puff properly. Make sure your oil is at the right temperature, and your yeast is fresh and properly activated. Sometimes, too, the dough just needs a little more time to rise, you know, especially if your kitchen is cool.
Q3: How do I store leftover Petulla?
Pet
- Kelly Monroe Wikipedia
- Kamala Harris Husband Net Worth
- Caitlin Mcswain
- Did Bruce Willias Die
- Taylor Estevez Movies
Petulla Recept: Hoe maak je authentieke Albanese Petulla

Petulla Recipe- Make A Delicious Albanian Pastry In 1 Hour

Petulla Recipe- Make A Delicious Albanian Pastry In 1 Hour
