Making Perfect Patacones: Your Guide To Crispy Latin American Plantain Bites
Imagine a golden, crunchy bite, savory and satisfying, that brings a bit of sunshine and warmth to your plate. That, in a way, is the magic of patacones. This beloved classic, known across many Latin American countries, is so much more than just a snack. It's a simple pleasure, a versatile side dish, and a truly delicious way to enjoy green plantains, which, you know, are pretty common in places where they grow abundantly, like, say, our yard.
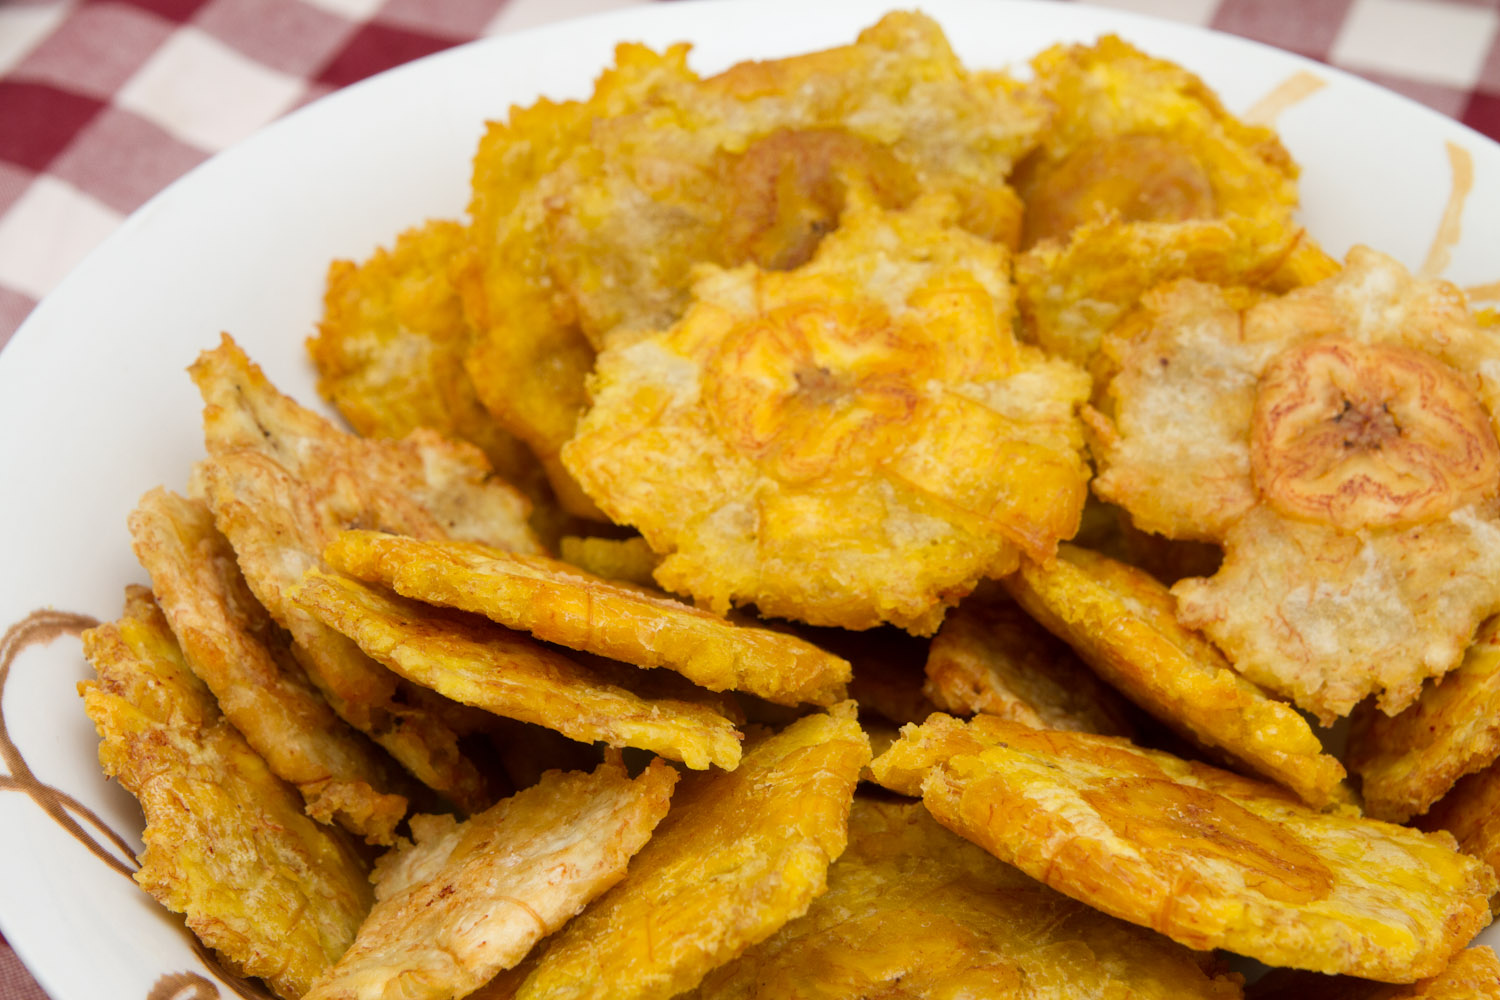
Patacones, sometimes called tostones, are green plantains that get a special treatment. They are peeled, sliced, given a quick fry, then flattened into neat discs, and then, rather importantly, fried again. This double-frying method is what gives them that truly unique texture—crispy on the outside, yet still tender inside, just a little bit starchy and so very comforting.
If you've ever wondered about making these wonderful bites yourself, or perhaps you're just looking for a new, simple side dish that packs a punch of flavor, you're in the right spot. We're going to explore all about patacones, from what makes them so good to how you can easily make them right in your own kitchen, too it's almost a little bit of a secret, but not really.
- Young Adam Sandler
- How To Grow Your Hair Fast In A Week
- Rick La Ruee Vers L Or
- Dafoe Wife
- December Birthdays
Table of Contents
- What Are Patacones, Anyway?
- Why You'll Love These Crispy Bites
- Getting Started: What You'll Need
- The Art of Making Patacones
- Serving Suggestions: Beyond the Basic
- Patacones Across Latin America
- Frequently Asked Questions About Patacones
What Are Patacones, Anyway?
Patacones, you see, are essentially fried green plantains. They go by a few different names, depending on where you are. In some places, they're widely known as tostones, which is a pretty common name, and in others, you might hear them called frito or even patacon pisao. It's a dish that really highlights the green plantain, which is quite different from a ripe, sweet yellow plantain, you know?
The idea behind them is rather simple, yet the result is truly special. You start with unripe, very green plantains. These aren't the sweet ones you might bake or mash for a dessert. No, these are starchy, and they hold their shape beautifully through the frying process. They are peeled, then cut into slices, which, as a matter of fact, can be a little tricky if you're not used to it, but you'll get the hang of it.
After the initial slicing, the plantain pieces get their first dip in hot oil. This isn't to cook them all the way through, but rather to soften them up just enough. It makes them pliable, which is very important for the next step. This first fry, you could say, is just preparing them for their true transformation, so it's a critical part of the process, actually.
Then comes the fun part: flattening them. Each softened slice is pressed down into a disc. There are special tools for this, like a tostonera, but you can use just about anything flat and sturdy, like the bottom of a glass or a small plate, which is what many home cooks do. This flattening increases their surface area, which, you know, helps them get extra crispy during the second fry, giving them that characteristic shape.
Finally, these flattened discs go back into the hot oil for their second frying. This is where they turn golden brown and develop that wonderful, satisfying crunch. They come out crispy, savory, and ready to be seasoned. This double-frying is really what sets patacones apart, giving them a texture that's quite distinct from other plantain dishes, and it's something you really notice when you bite into one, you know?
Why You'll Love These Crispy Bites
There are so many reasons to fall for patacones. For one thing, they're incredibly versatile. They can be a satisfying snack all on their own, especially if you're looking for something savory and crunchy. But they also work wonderfully as an appetizer, a breakfast item, or a side dish. In Costa Rica, for instance, they are served as a side dish with most meals, which really shows how much they are enjoyed there.
The texture is a big part of their appeal. That crisp, golden exterior gives way to a tender, starchy inside. They're salty, which contrasts nicely with the subtle sweetness that green plantains can sometimes have, even when unripe. It's a very simple flavor profile, yet it's deeply comforting and rather moreish, if you know what I mean. You just want another one, basically.
And, honestly, they're pretty simple to make. With all the plantains growing in our yard, we've been making patacones a lot, and it's become a regular thing. It’s a great way to use up a bounty of green plantains, turning them into something truly delicious without too much fuss. You don't need a lot of fancy ingredients or equipment, just some green plantains, oil, and salt, which is pretty accessible for most people.
Beyond just being a tasty bite, patacones are a fantastic canvas for other flavors. They're delicious on their own, yes, but they also pair beautifully with all sorts of dips and sauces. This makes them endlessly customizable, so you can really make them your own. Whether you're serving them with a simple sprinkle of salt or loading them up with toppings, they always deliver a flavorful experience, which is pretty cool.
So, whether you call them patacones or tostones, or even frito, these crispy, golden rounds offer a flavorful bite of Latin America. They are a simple yet satisfying snack or side dish that transforms green plantains into truly crispy, savory bites. They have this way of making a meal feel a bit more special, or just being that perfect little something to munch on, which is why they are so loved, really.
Getting Started: What You'll Need
To make these wonderful patacones, you don't need a long list of ingredients or specialized kitchen gadgets, which is pretty convenient. The main star, of course, is the green plantain. You want them to be firm and bright green, with no yellow spots at all. If they start to turn yellow, they're getting sweeter, and while still usable for other things, they won't give you that classic starchy patacón texture, you know?
You'll also need a good amount of cooking oil for frying. Vegetable oil, canola oil, or even sunflower oil works well. The key is to have enough oil so the plantain pieces can be submerged, or at least mostly submerged, during both frying stages. This helps them cook evenly and get that beautiful golden color all around, which is very important for the final product.
Salt is another crucial ingredient. It might seem like a small thing, but a good sprinkle of salt right after the second fry really brings out the flavor and makes those crispy bites even more enjoyable. Some people like to add a little garlic powder or other seasonings to the salt, which is totally up to you, but plain salt is often perfect, honestly.
For equipment, a heavy-bottomed pan or a deep fryer is best for frying. You'll also need tongs or a slotted spoon to safely handle the plantains in the hot oil. And, of course, a plate lined with paper towels for draining the excess oil after each frying. Changing the paper towels between the two fryings is a good idea, as it helps keep the patacones from getting greasy, which is something you really want to avoid.
Lastly, for the flattening step, you'll need something sturdy and flat. As mentioned, a tostonera is designed for this, but the bottom of a heavy glass, a small plate, or even a cutting board works just fine. The goal is to press the softened plantain pieces into thin, even discs. It's a pretty straightforward setup, and once you have these basics, you're more or less ready to go, which is nice.
The Art of Making Patacones
Making patacones is an art, in a way, but it's an art that anyone can master with just a little practice. It's all about those two distinct frying stages and the flattening in between. So, let's break down the process step by step, which, you know, really helps make it clear.
Picking the Right Plantains
The foundation of great patacones starts with selecting the right plantains. You absolutely need green plantains, the greener the better, actually. If they have any yellow or black spots, they're starting to ripen, and that means their starch is converting to sugar. While ripe plantains are fantastic for other dishes, like maduros, they won't give you the firm, starchy texture that patacones need. So, look for plantains that are firm to the touch and uniformly green all over, which is a pretty good indicator of their ripeness, or lack thereof, in this case.
When you get them home, you'll need to peel them. Green plantains can be a bit tough to peel, much tougher than bananas, as a matter of fact. A good trick is to cut off both ends, then make a few shallow cuts lengthwise along the peel, just through the skin, but not into the flesh. Then, you can use a knife or your fingers to pry off the peel. Sometimes, you might need to use a spoon to help separate the peel from the fruit, which can be a little stubborn, you know?
Once peeled, you'll slice the plantains into pieces. The thickness of your slices will affect the final patacón. Most people aim for slices about an inch thick, or perhaps a little more. This thickness allows for a good balance of tender interior and crispy exterior after the double frying. Uniform slices will also help them cook more evenly, which is always a good thing when frying, really.
Some folks like to soak the peeled and sliced plantains in a bowl of salted water for a few minutes before the first fry. This step is optional, but some believe it helps to keep them from sticking and can also add a little bit of seasoning from the start. It's a small detail, but sometimes those small details can make a difference, you know, in the final taste.
So, remember, the greener the plantain, the better for patacones. This is a pretty fundamental rule for achieving that classic savory, starchy bite. It's the starting point for all the deliciousness that's about to come, and it's something you really want to get right from the very beginning, honestly.
First Fry: Softening Them Up
The first fry is all about softening the plantain slices, not about making them crispy just yet. You'll want to heat your oil in a heavy-bottomed pan or deep fryer to a medium temperature, around 325-350°F (160-175°C). If the oil is too hot, the outside will brown too quickly before the inside has a chance to soften. If it's too cool, the plantains will absorb too much oil and become greasy, which, you know, nobody wants.
Carefully place the plantain slices into the hot oil, making sure not to overcrowd the pan. Fry them for about 3-5 minutes on each side, or until they are tender and slightly golden, but not deeply browned. They should feel soft when you poke them with a fork, which is a good sign that they're ready for the next step. This stage is really just about making them pliable for flattening, so don't expect them to be crispy yet.
As they finish their first fry, remove them from the oil and place them on that paper towel-lined plate to drain. This helps to get rid of any excess oil before the flattening. It's a small but important step that contributes to the overall crispiness of the final patacones. You want them to be warm and soft when you go to flatten them, so don't let them cool down too much, which is pretty key.
This initial frying step is, in a way, like a gentle coaxing. You're preparing the plantain for its transformation. It's not about achieving color or crunch right now, but about getting that internal texture just right so it can be easily pressed without breaking apart. It's a very specific kind of cook, and getting it right sets you up for success later on, basically.
So, take your time with this first fry. It's a foundational step that ensures your patacones will have that perfect combination of tenderness inside and crispiness outside. It’s about getting them ready, truly, for their moment in the press, and then their final, glorious crisping, you know?
The Flattening Secret
Now for the fun part, the flattening! This is what truly turns a fried plantain slice into a patacón. While the plantain pieces are still warm from the first fry, take each one and place it on a flat surface. This could be a cutting board, or even directly on your tostonera if you have one. You want them warm enough to be pliable, but not so hot that they burn your fingers, which is a pretty good balance to find.
To flatten them, you'll need something sturdy and flat. A tostonera, as mentioned, is a specialized press, often made of wood or plastic, that makes this step very easy and uniform. But if you don't have one, don't worry. The bottom of a heavy glass, a small plate, or even a heavy can wrapped in plastic wrap can work just as well. The idea is to apply firm, even pressure to flatten the plantain slice into a disc, you know?
Press down firmly until the plantain slice is flattened to about 1/4 inch thick, or even a little thinner if you like them extra crispy. Be careful not to press too hard, or they might break apart. You're aiming for a disc shape, and sometimes they'll naturally form a slightly irregular, rustic shape, which is perfectly fine and often adds to their charm, honestly.
Some people like to dip the softened plantain slices in a bowl of cold water or a little garlic-infused water before flattening. This can help prevent them from sticking to the press or whatever you're using to flatten them, and it can also add a subtle hint of flavor. It's a little trick that some home cooks swear by, and it's something you might want to try, just to see if it makes a difference for you.
This flattening step is what gives patacones their characteristic wide, flat shape and increases their surface area, which is pretty important for the second fry. It allows them to get incredibly crispy all over when they go back into the hot oil. It's a very satisfying part of the process, seeing those thick slices transform into thin, ready-to-crisp discs, basically.
So, whether you're using a fancy tostonera or just a humble glass, the key is to flatten them evenly and while they're still warm. This ensures they'll cook up beautifully in the final frying stage, giving you that perfect patacón experience. It's a moment of transformation, really, for the plantain, and it's pretty cool to watch it happen.
Second Fry: Getting That Golden Crunch
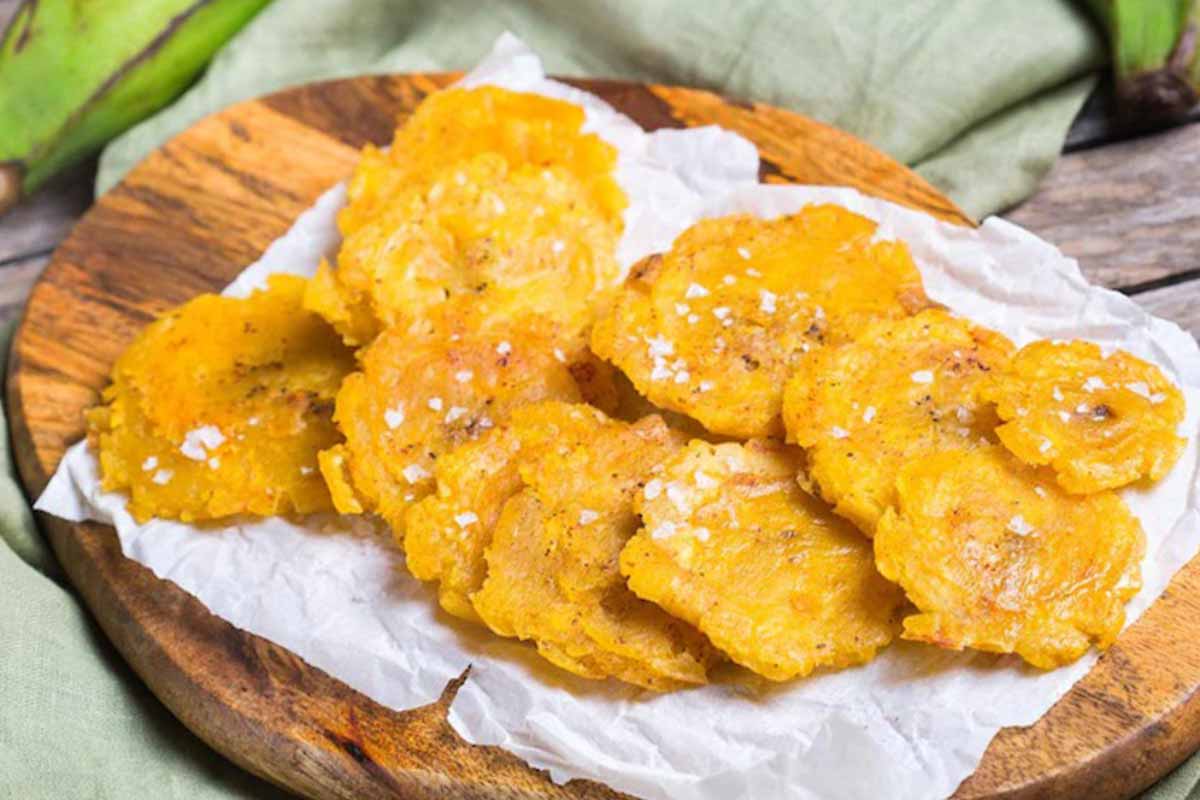
This is where the magic really happens, where your flattened plantain discs transform into those wonderfully crispy, golden patacones you've been dreaming of. After flattening all your plantain pieces, it's time to get the oil hot again. You'll want to increase the oil temperature slightly from the first fry, aiming for around 350-375°F (175-190°C). This higher temperature is crucial for achieving that desired crispiness without making them greasy, which is a common concern when frying, you know?
Carefully place the flattened plantain discs back into the hot oil. Again, avoid overcrowding the pan. Fry them for another 2-4 minutes on each side, or until they are a deep golden brown and look visibly crispy. You'll notice they get a beautiful, almost blistered texture on the surface, which is a really good sign that they're getting that perfect crunch. This is where they develop their signature color and texture, so keep a close eye on them.
As they fry, you might hear a satisfying sizzle, and you'll see them firm up. This second fry is all about cooking them through completely and, more importantly, developing that amazing crispness. The higher heat helps to evaporate any remaining moisture, leaving you with a dry, crunchy exterior that is just so delightful to bite into, basically. It's a very quick process at this stage, so be ready to remove them.
Once they reach that perfect golden hue and feel firm and crispy, use your tongs or slotted spoon to carefully lift them out of the oil. Immediately place them back on a fresh paper towel-lined plate. This is very important for draining off any excess oil. Remember to change the paper towels between the two fryings, and use fresh ones for this final draining step. This helps ensure your patacones are crispy, not oily, which is pretty much the goal.
The difference between the first and second fry is quite stark, actually. The first softens, the second crisps. This dual approach is what makes patacones so special and gives them their unique appeal. It’s a technique that has been perfected over generations, and it truly works wonders on green plantains, which is something you can really appreciate when you taste the final product.
So, take pride in this final frying stage. It’s the moment your efforts pay off, turning simple plantain slices into those irresistible, golden-brown, crunchy discs. It's a very satisfying part of the cooking process, and the aroma alone is enough to get your taste buds excited, you know?
Seasoning for Perfection
Once your patacones come out of that second fry, hot and gloriously golden, the very next step is to season them. This is a pretty crucial moment, as the heat of the patacones will help the salt adhere and melt slightly, ensuring every bite is perfectly seasoned. A simple sprinkle of fine sea salt or table salt is often all you need, and it’s what many traditional recipes call for, honestly.
Sprinkle the salt generously over the hot patacones as soon as they are on the paper towel-lined plate. You can do this on both sides if you like, making sure they get a good, even coating. The salt really brings out the savory flavor of the plantain and enhances that wonderful crunch. It’s amazing how something so simple can make such a big difference, you know?
While plain salt is classic and delicious, you can certainly experiment with other seasonings if you feel like it. Some people like to add a little garlic powder, or even a dash of onion powder, to their salt mix. A pinch of cayenne pepper could add a very subtle kick if you enjoy a little heat. The beauty of patacones is that they are salty and crunchy and delicious on their own, but they also welcome other flavors, which is pretty cool.
The key here is to season them while they are still piping hot. If you wait too long, the salt won't stick as well, and you might end up with unevenly seasoned patacones. So, have your salt shaker ready as soon as they come out of the oil. It’s a small detail, but it makes a big impact on the final taste experience, basically.
This final seasoning step is the last touch before serving, completing the transformation of green plantains into these irresistible savory bites. It’s the moment that really brings all the textures and subtle flavors together, making them ready to be enjoyed as a snack, a side, or whatever you choose to pair them with, you know? It's the grand finale, really.
Serving Suggestions: Beyond the Basic
Patacones are incredibly versatile, which is one of their best qualities, honestly. While they are perfectly delicious on their own, especially when fresh and hot with just a sprinkle of salt, they also make a fantastic base for all sorts of toppings and accompaniments. This means you can really make a meal out of them, or just elevate them into something more substantial, you know?
One of the most classic pairings, especially in Colombia, is with hogao. Hogao is a flavorful creole sauce, typically made with tomatoes, onions, and various herbs. It’s a warm, savory
- Awards Won By Shemar Moore
- Is Dustin Hurt Still Alive
- Bumpy Johnson Malcolm X
- Allen Payne News
- Jade Yorker Net Worth
Patacones colombianos: conoce la receta tradicional y los distintos

Patacones, Fried Green Plantains
Patacones: una fácil y rápida entrada que a todos les encantará | Walac
